How to beautifully sprinkle the sides of a cake with crumbs?
The more I look at the photos of cakes posted on the website, the more... I would rather help and advise - everything is done simply, and the appearance of your delicious products will be more attractive.
We all baked and bake cake layers. Is it worth repeating what everyone knows that a lot depends on the oven? Therefore, let's leave the oven alone and focus on our capabilities.
The recipe says to “roll out the dough into a cake with such and such a diameter” - we obediently roll it out. What's next? And, I remember, roll the dough onto a rolling pin and transfer it to a baking sheet (this is from my own experience, if anything, maybe there are no such recipes now). Well, we baked the cake - it didn’t turn out very round, and the edge was thicker here, thinner there - was it? It’s okay, then we’ll cover the edges with cream and hide all the flaws, no one will notice anything.
Until recently, I thought so too - well, it turned out delicious, we ate everything instantly, what’s there to talk about? Homemade cake, this is not a pastry shop.
...
This cake is posted here on Povarenka, but... actually, the resentment for this wonderful recipe was the impetus for this post. Unfortunately, simplifying a recipe is not always beneficial. I will give examples based on this honey cake, but this is for example only; any of us has enough everyday experience to understand what we are talking about.
Nowadays there are many convenient kitchen gadgets (not all of them are equally necessary and useful, by the way), but the most important thing is that we need a cake of a beautiful and correct shape
- a cake ring and a springform pan of the same diameter (straight walls and fastened on the side with a clasp). (There is a one-piece form, where the bottom is pulled out upward, and the corrugated walls expand upward - this will not work).

The cake ring is a metal ring 3 centimeters high, without any special features.

While I didn’t have one, I took a regular baking dish made of aluminum foil of the diameter I needed (the walls should be straight) and simply cut out the bottom from there. (I live in Israel, we have many such forms, they cost pennies).
We took baking paper. Place it on the table (or on a silicone mat with the diameters drawn, they shine through the paper). *I’m not exactly a re-insurer... but I’m used to lubricating this paper, approximately a circle of the size I need, by eye - just oil from the refrigerator, easy to swipe over the paper and that’s it. There is practically no such oil there, it’s more out of habit*
The dough for the crust can be of any consistency - from liquid, which is poured, to one that can only be laid out in pieces - in short, your dough must be distributed in any way according to a given shape. There are no problems with the liquid dough - I poured it and that’s it. With thick honey, place it in pieces in a mold, like plasticine, press it with your hands; for thick and viscous honey cakes, lightly moisten the palms of your hands with water. Well, on the table on paper we laid out the dough of the size we need (approximately), try on the shape so that there is no “shortage” at the edges, let there be an excess, this is only a plus, it will be used for topping. Have you tried it on? Fine? We take this sheet and transfer it with the dough to a baking sheet, and only now place the mold on top. If the dough is liquid, then pour it directly into the mold onto paper on a baking sheet.
Honey skins bake very quickly. While the cake is baking, I have time to make 2-3 more pieces on paper for the cake.
The cake is baked - take out the baking sheet, remove the sheet of parchment along with the cake (I put this sheet on the wire rack). If I took a ring from an aluminum foil pan, then you just take it (the pan) with your hand (it’s not at all hot) and put it on the next cake layer, and then put it in the oven. If the metal ring is hot, don’t take it with your bare hand (that’s why I don’t like to take the springform pan itself, it’s tall and it’s easy to get burned).
What we see in the ring and what we don’t see without the ring - in the ring the dough rises like a sponge cake, the cake is 1.5-2 cm high, honestly, and has a perfect round shape.

We take a knife and cut out a biscuit along the edge of the metal ring (I don’t lubricate the ring with anything), it turns out to be a very beautiful cut, nice to look at. We put the trimmings from the outside into a bowl (it will be used for topping).
Without a ring - an ordinary pancake: in the center it is thicker, along the edges the thickness of the cake tends to zero, the circumference is far from ideal. Alas.
We baked some cakes. We made a cream (it’s better to make it according to the original recipe, on Povarenka the recipe is reduced). There should be a lot of cream. Plums - there should also be a lot of plums, cut into long thin strips, the 24 cm cake will be practically covered with them (plum - 2 layers, don’t forget). Nuts - I understand what they found and bought at the nearest supermarket, but after the second cake I went to the market to look for delicious nuts and found them. You are making a cake for yourself, for your family.
The last cake layer, which is usually used for topping - by this point it should already be clear to you that this particular cake layer (if there is still a need for it) may not be a round cake layer at all. Lay out the dough as much as there is left and bake it a little harder (but not to the point of “a little burnt” and do not overdry)
We begin to assemble the cake in a springform pan. You need to put a little cream on the bottom of the mold, just a drop, the bottom cake will stick and will not slide (this will be important when moving the cake somewhere). The cakes fit tightly into the mold. In general, if you think of weighing the empty container in which you will make the cream, then after preparing the cream, you can weigh this dish again and understand approximately how much cream you need for 1 layer (in this case: 4 layers + cream on the side surface, We count it as another cake layer, so we roughly divided the resulting weight into 5 parts). For the first cake, you take this cream from the bowl and understand how much it is, how many spoons, then you don’t have to weigh anything.
Now it’s important not to skimp, we calculated 200 g (this is an option for cream with vanilla pudding), which means you lay out these 200, spread them over the entire surface, don’t skimp on the edges! If some edge of the cake almost reaches the edge (it happens - we are all people, we are all human), then add more cream to this problem area. The cream will not escape from the mold anywhere, but it will even out absolutely everything. Second cake and so on. Upper layer. Again the right amount of cream.
In general, you get a lot of cream (which is just a plus) - it’s not too much, but just the right amount. For example, I prefer to put a layer of cream on the cake, plums or nuts on top of this cream, and add cream on top again, and then the next cake layer. For what? - then the cake will be well soaked from below too, I like it better this way. It would be naive to expect that the side of the dry cake that lies entirely on prunes will be as soft and rich as the one covered with cream.
Now put the cake in the refrigerator, even for a few minutes (5 is enough), just during this time we have time to make the topping - mix the crumbs and the remaining nuts. You can crumble the whole thing with a rolling pin (the nuts or cake scraps should be in a bag), but if you have a blender, it will turn out much faster, more beautiful and easier. If you don’t have a blender, it’s okay, a rolling pin will help out. The main difference, as I noticed, is that if you crush the nuts with a rolling pin, they may become a little oily. By the way, first I sort out the nuts (I learned from my own bitter experience, when I came across a piece of shell in a nut pie in a cafe, it was very unpleasant), rinse it, then dry it in the oven - it’s all quick.
After a few minutes, take the cake out of the refrigerator.
* Now another lyrical digression. You want to make the cake big, don’t you? Well, so that there is something to eat. I understand, I myself had a large family until the children grew up and moved away. But if you do everything correctly, your cake will be about 10 cm high. The sprinkles on the sides will also add at least 1.5 cm in diameter. And the question immediately arises: do you have a dish of this diameter? Not just a large dish, but so that the flat surface is no smaller than the diameter you need? (that is, the sides of the dish or plate no longer count) And if you decide to bring this beauty to work, then HOW will you transport this giant??? Therefore, I do not recommend increasing the diameter, the shape is 24 cm - and the cake will be huge, believe me *
We've reached the exciting stage - sprinkling (not tired of reading? The materiel will soon be over). I’ll say right away that this turned out to be the most time-consuming operation! Therefore, after the first such cake, I began to look for a solution.

I found it and will tell you now. If you have such a spatula for cream - good, if not - then a silicone spatula will also work, but it has a long handle, which is not so convenient for me personally.

We take the cake out of the refrigerator. Carefully unfasten the form and remove it (the bottom remains, of course). Now attention. At this point, you can decide whether you need to bother icing the sides of your cake at all - I mean it. The cake looks very beautiful and presentable. The sides are perfectly even and smooth, all layers are visible, the thickness of the cream layer between the layers is not less than 1 cm. Often the edges of homemade cakes turn out dry, but not in this case, when you assemble the cake in a mold and do not skimp on laying out the entire required portion of cream . If you decide that this is enough, you can decorate the top of the cake, carefully return the mold to its place and return the cake to the refrigerator until X hour.
Who decided to go for a walk like this, shall we continue?
Remove your prepared cake plate. (I bought a cardboard plate with a diameter of 28 cm from a disposable tableware store.) Place a sheet of parchment paper on the dish and now place your cake here, carefully holding it under the bottom (it is metal). Look what happened - the parchment near the cake rose like frills. Now, when you sprinkle the cake, nothing will spill on the table, everything remains in this paper.
Now, to make it convenient, take a large-diameter pan, turn it upside down, and place your dish with the cake on it (to make it convenient to rotate the cake and not have to bend over too much).
Scoop up crumbs with a cream spatula, bring the spatula to the cake and gently press the crumbs from bottom to top. Some of it crumbles, of course - nothing, again with a cream spatula you grab a portion of delicious crumbs at the base of the cake and again easily press them to the side surface of the cake. We turned the plate a little - and everything started again. On the table itself you don’t have any crumbs, and no waste at all (and remember earlier, the whole kitchen is covered in crumbs... how much to clean up later... brrrr)
Now you can easily transport the cake, move it with this paper, remove it at the very last moment.
The cake turns out very big. I remembered the math and recalculated everything into a smaller shape (it's easy).
Questions (I get asked all the time at work, so I answer right away):
What to do if you don’t have a cake pan or ring?
It will just spread on the sheet, that’s for sure. Better take a foil pan and cut out the bottom. If this is not possible, then you can get out of it this way: find a frying pan slightly larger than the required diameter (pay attention to the handle of the frying pan! So that it doesn’t cause excruciating pain when you try to squeeze the frying pan into the oven, you get the idea). Be sure to place a sheet of baking paper on the frying pan (cut out a circle). Once baked, cut out a circle of the required diameter from the baked cake (on a plate), just hold the knife perpendicularly so that the edges of the cake are even, then everything will turn out like in the picture above. But this is a completely extreme case.
If you don’t have a springform pan, try to find a paper one; they are usually straight in height and without any frills. If you didn’t find such a shape in the store - don’t panic, take the same baking paper, fold it in several layers, make yourself a ribbon - about 10 cm high, and now make yourself this shape, fasten a couple of sheets together so that the ribbon is long enough . (Circumference length for a shape with a diameter of 24 cm: P = Pi * d = 24 Pi ≈ 75.398208 cm, do not forget to add a couple of centimeters to your pattern so that the edge meets the edge and secure this edge. Girls, I didn’t find the symbol of the Greek letter Pi = 3.14 - geometry, 6th grade).
Why does honey cake with cream stay in the refrigerator for a day?- and it gets soaked. The analogy is literally how we defrost food from the freezer by placing it on the refrigerator shelf overnight, and in the morning it can be used. So is the cake - the cakes are soaked, but, figuratively speaking, they do not stick together into one pancake, which will happen if you just leave the cake on the table overnight (although the taste probably shouldn’t suffer).
The taste becomes completely different - bright, rich honey, sweet and sour.
(well, they also put it in the refrigerator for safety reasons, so that it doesn’t spoil if it’s hot, and the cake will retain its shape when cut. But I’m talking about honey cake with sour cream; other cakes may have their own nuances.)
There is another problem - if you have a child who is able to open the refrigerator on his own, then the inquisitive child will not be satisfied with just contemplating the cake in the refrigerator and will definitely find the opportunity to break off a piece to try. I place the cake in a low, large-diameter pan (28 cm) with a lid (with parchment paper the cake is very easy to move, don’t skimp on the paper) so that the cake doesn’t accidentally absorb any foreign odors, and so that the whole refrigerator doesn’t smell like honey.
About myself - I am never a cook or a pastry chef by profession.But an active user in the kitchenTherefore, the advice is more likely to come from the “News from the Fields” section.
At first I decided to post a cake recipe with photographs of each stage described here, but I thought that now I would bake it only on January 1, and by that time you will all have baked your own delicious cakes, so I decided to make a post now so that someone has time take advice. I’m new to the site, and of course I don’t know a lot - someone tell me if it’s possible to post a recipe similar to what’s on the site, but more detailed, or something, and with your own comments.
Thank you.
I wrote everything for a long time, but everything is done very quickly and without hassle
I wish everyone beautiful and delicious cakes!
Julia
P.S.
If I unknowingly violated the rules of the site, then do not attack in chorus and do not hit me with ladle, I will correct myself! It’s better to tell me where to read these rules and how to post links correctly.
Photos are not mine, taken from the Internet. because here I am only telling you what these kitchen tools are and how to use them.
If you love baking cakes, then this article is especially for you! In this article we will look at a wide variety of ways to decorate cakes with your own hands at home. You can transform an ordinary cake with mastic, marzipan, icing, waffles, chocolate, glaze, cream, cream, meringue, fruit, jelly, sweets, marmalade and sprinkles. We will look at each ingredient of the decoration separately, get acquainted with the recipe for making it, and, of course, be inspired by a huge number of ideas.
For some cake decorating options, you will need special materials such as: a pastry syringe with nozzles, parchment paper, a sharp thin knife, spatulas of different thicknesses.
Mastic- This is a special dough for decorating a cake. You can roll it out and cover the top of the cake, you can also create various animal figures, letters, numbers, flowers, leaves, openwork patterns and whatever your imagination desires.
The basic rule for working with mastic is that you have to work with it very quickly, since it hardens instantly. But there is a way out! When you form the decoration, pinch off the desired piece and wrap the rest of the mastic in film. Large figures may crack when drying.
Mastic recipe No. 1
Ingredients: condensed milk, powdered milk or cream, powdered sugar, food coloring (optional). The amount of ingredients directly depends on the size of the cake.
Cooking process: Take a deep bowl and mix dry milk or cream with powdered sugar. Gradually add condensed milk and mix well. You should get an elastic dough that does not stick to your hands. Add food coloring drop by drop and mix into the dough. After cooking, immediately wrap the mastic in film.
Mastic recipe No. 2
Ingredients: water, lemon juice or citric acid, butter, powdered sugar, starch, marshmallows (white chewy marshmallows), food coloring (optional).
Cooking process: Melt the steamed marshmallows and add drops of food coloring if desired. Then add water and just a little lemon juice or citric acid. Mix the mixture well and then add 50 grams of butter. Separately mix powdered sugar and starch in a ratio of 1:3. Gradually add the powdered starch mixture to the marshmallow mixture and knead the dough well for about 10 minutes. After cooking, immediately wrap the mastic in film.
Marzipan is a nut mass that consists of almond flour and sugar paste. Its advantages are that it holds its shape perfectly, is quite elastic and has an amazing delicate taste. It is convenient to create all decoration elements from it - small figures, cake covering and voluminous decorations.
Marzipan recipe
Ingredients: 200 grams of sugar, a quarter glass of water, 1 glass of lightly roasted almonds, butter.
Cooking process: Peel the almonds and finely chop them in a blender or on a grater. Make syrup from sugar and water. The consistency of the syrup should be thick. Pour the ground almonds into the syrup, stir and cook for 3 minutes. Take a bowl and grease it well with butter. Pour the marzipan into a bowl. Cool the marzipan and pass through a meat grinder. Marzipan is ready! If it turns out liquid, add powdered sugar. If the marzipan is very thick, add a little boiled water.
I recommend a photo gallery of marzipan cakes!
Icing- This is an ice pattern that looks like a winter pattern on a window and tastes like crispy ice. The advantages of icing are that it is quite durable, does not spread, and adheres well to the surface of the confectionery product. It can be applied on top of hard chocolate glaze, mastic, fondant. It is worth noting that the surface on which icing can be applied should not spread or be sticky. The icing is applied with a pastry syringe, then the finished product is placed in the refrigerator for further hardening. Lace, inscriptions and patterns turn out very beautiful.
Icing recipe
Ingredients: 3 eggs, 500-600 grams of powdered sugar, 15 grams of lemon juice, 1 teaspoon of glycerin.
Manufacturing process: Cool all ingredients, degrease the dishes and wipe them dry. Take the eggs, separate the whites from the yolks. Beat the egg whites, add glycerin, lemon juice and powdered sugar. Beat the mixture well with a whisk until it turns white. Cover the mixture with film and place in the refrigerator for 1 hour to burst the air bubbles. The icing is ready, you can safely decorate the cake!
Waffles– these are materials for decorating flowers, various figures, numbers. They are made from crispy waffle dough. Ready-made edible pictures based on waffle crust are also popular. You can purchase this decoration in confectionery stores, supermarkets or on the Internet. You won’t be able to make waffles with an image on your own, as you will need edible ink and special equipment. The advantages of waffles are that they do not crack, hold their shape perfectly and do not melt. However, they can only be used on a light-colored surface of the cake, since when soaked, the picture may become saturated with dark cream.
Waffle design rules

Decorating with chocolate is considered a classic decoration for cakes. This ingredient goes well with biscuits, souffles, mousse, puff pastry and various creams. The advantages of chocolate are that, once melted, it can be given any possible shape, and when the chocolate hardens, it will not crack or spread. To decorate cakes, you can use any chocolate - black, white, milk, porous.
Methods for decorating cakes with chocolate
- To decorate a cake with chocolate chips, simply grate a chocolate bar and sprinkle it over the cake.
- To decorate the cake with curls, lightly warm the chocolate bar, then take a thin knife, or better yet, a vegetable cutter and cut thin strips, they will immediately begin to curl. You can create gorgeous patterns from them.
- Here is another way to decorate a cake with openwork patterns, inscriptions and drawings. Melt the chocolate bar in a steam bath. Place the chocolate into a pastry syringe. Take parchment paper and draw patterns. Use a pastry syringe to draw patterns onto the parchment paper. Place the parchment in the refrigerator to allow the chocolate to set. Carefully remove the chocolate from the parchment and decorate the cake. If you are not good at drawing, find a beautiful pattern on the Internet, print it out, attach transparent parchment paper to the drawing and simply copy it.
- To decorate the cake with chocolate leaves, you will need real tree leaves or houseplants. Wash and dry the leaves. Melt the chocolate in a steam bath and place it on the inside of the sheet with a silicone brush. Place in the refrigerator, and when it hardens, carefully remove the chocolate from the leaf and decorate the cake.
- Another creative way to decorate a cake is to use cherries and chocolate. Discard the pits, place each cherry in the melted chocolate and decorate the cake.
At the moment there are chocolate, mirror, marmalade, caramel, multi-colored, soft, milk and creamy glazes.
Chocolate frosting recipe
Ingredients: 1.5 tablespoons of milk, 2 teaspoons of cocoa powder, 1.5 tablespoons of sugar, 40 grams of butter.
Cooking process: take a bowl, put cocoa, sugar, pieces of butter, and pour milk. Place on fire, melt and boil for 5-7 minutes. Cover the cake with chocolate glaze using a wide knife and place in the refrigerator to further harden.
Caramel frosting recipe
Ingredients: 150 grams warm water, 180 grams fine-grained sugar, 2 teaspoons cornstarch, 150 grams heavy cream, 5 grams leaf gelatin.
Cooking process: Soak gelatin in water, mix cream with starch, melt sugar in a frying pan until light brown. Add cream with starch and sugar to warm water. Boil until the caramel dissolves. Don't forget to stir the mixture constantly. Then pour it into the cream, stir, cool and add the swollen gelatin. Cover the cake with caramel icing using a wide knife and place in the refrigerator to further harden.
Marmalade glaze recipe
Ingredients: 200 grams of marmalade of the same color, 50 grams of butter, 2 tablespoons of fat sour cream, 120 grams of sugar.
Cooking process: melt the marmalade in a steam bath or in the microwave, add sour cream, butter and sugar. Mix the mixture well and put on fire. Cook the glaze for 10 minutes, stirring constantly. Cool the glaze slightly. Cover the cake with marmalade icing using a wide knife and refrigerate for 3-4 hours to further harden.
Cream– universal decoration for cakes. It is very convenient for them to write congratulations, make openwork frames, lush roses. Food coloring is often added to cream.
Buttercream recipe
Ingredients: 100 grams of butter, 5 tablespoons of condensed milk, food coloring.
Cooking process: Melt the butter in a steam bath or in the microwave. Whip it until it becomes white and fluffy. Add condensed milk, mix well and divide the cream into portions. Add dye of the desired color to each portion of cream. Place the cream in a pastry syringe and create beauty, then send the cake into the cold so that the cream hardens.
Whipped cream– this is an original airy, voluminous and delicate decoration. Their preparation does not require special products. To beautifully decorate the cake with whipped cream, you will need a pastry syringe. You need to work with cream fairly quickly. Make sure all ingredients and tools are prepared. The surface of the cake should be smooth and not too sticky.
Whipped Cream Recipe
Ingredients: half a liter of high fat cream from 33%, a bag of vanilla, 100-200 grams of powdered sugar, 1 bag of instant gelatin, food coloring (optional).
Cooking process: Place the cream in the refrigerator for 12 hours. Pour chilled cream into a deep container. Take another deep container and pour ice water into it. Place the container of cream in a container of ice water. Dissolve gelatin in the manner indicated on the package. Beat the cream with a mixer (do not use a blender, as it will not create foam). Beat them until the foam becomes strong enough. Add the powdered sugar and vanilla, then whisk to combine. Add dissolved gelatin in a thin stream. Place the cream in a syringe and decorate the cake.
I recommend a photo gallery of cakes decorated with whipped cream!
Meringue- This is a snow-white, crispy and very tasty decoration. It is laid out on a layer of chocolate, jam, or cream.
Meringue recipe
Ingredients: a glass of powdered sugar, 5 chilled eggs, a bag of vanilla (optional).
Cooking process: Separate the whites from the yolks, pour the whites into a dry, fat-free deep container. Beat the whites until fluffy (10-15 minutes). Gradually add powder (1-2 teaspoons) and immediately dissolve it. Add vanilla and dissolve it well. Preheat the oven to 100 degrees, cover a baking sheet with parchment paper and transfer the protein foam into a pastry syringe. Pipe the egg white mixture onto the baking sheet, creating beautiful balls or other shapes. The meringue is dried, not baked; the time the future meringue stays in the oven depends on the size of the pieces. Approximate drying time is 1.5-2 hours.
Fruits are very tasty, healthy and contain a huge amount of vitamins. They brightly decorate the cake with flavor combinations and rich colors. The easiest way to decorate with fruit is to fan out sliced strawberries, kiwi, orange, mango and other various fruits. You can create a whole fruit cloth that combines perfectly with natural jelly.
Recipe
Ingredients: fresh fruits and berries, for fruit jelly - light juice, for example apple 600 ml, a glass of powdered sugar, 1 package of powdered gelatin.
Cooking process: Pour the gelatin over a glass of juice and set aside to swell. Prepare the fruits, peel them and cut them into small beautiful slices. Kiwis and bananas are cut into circles, apples and oranges - into half rings, strawberries - in half, raspberries, blackberries, cherries - left whole. Melt the gelatin in a water bath, add the remaining juice and powdered sugar. Strain the mixture, arrange the fruit beautifully in the jelly and refrigerate. When the jelly has hardened slightly, transfer it to the cake, turning the container over. If desired, cover the edges with buttercream or whipped cream. Place the cake in the refrigerator.
The jelly looks very beautiful and has a beneficial effect on people’s joints. Jelly filling goes well with various fruits. However, you can decorate the cake in its pure form, or you can decorate the top with jelly filling, sprinkled with coconut flakes or nuts, be original and think over the decoration concept!
Jelly filling recipe
Ingredients: 600 ml of juice (you can take juice of different colors), 1 package of quickly dissolving gelatin, a glass of powdered sugar.
Cooking process: Soak the gelatin in 1/3 of the juice and leave to swell. Then melt the gelatin with steamed juice. Mix powdered sugar and remaining juice, pour into molds and refrigerate. Pour 100 ml of jelly and put it in the refrigerator for a while so that it has time to set. Place the cake in a mold that is 3 cm higher than it. Place the jelly filling on the cake and decorate the top with jelly from the molds. Steam will help you easily remove the jelly from the molds. It is enough to hold the mold with jelly over the steam, and then turn it over for dessert. Place the cake in the refrigerator for 10-12 hours and remember to remove the mold before serving. If you want to make jelly filling with fruit, then prepare the jelly as described above. Place it in the refrigerator for a while to give it time to set. Transfer the jelly onto the beautifully arranged fruit, smooth it out with a spatula and refrigerate overnight. To prevent the jelly from breaking during serving, cut it with a heated knife.
Candies- This is a favorite treat for children. Kids pay attention to the design of the cake itself, and not to the products from which the cake was made. Try to decorate the cake for a children's party as brightly and creatively as possible. You can use all types of candies except lollipops. The surface of the cake should be thick and viscous, for example - whipped cream, buttercream, icing.
Ways to decorate cakes with candies
- The sides of the cake can be decorated with chocolate bars or wafers, and the top can be filled with dragees.
- Small toffees are perfect for creating a pattern or lettering on a cream surface or white glaze.
- Cut the gummies into squares and randomly decorate the surface of the cake with white fondant or whipped cream.
- It is good to decorate the sides with round candies, and put 3 candies in the central part of the cake.
- The powder is used only on sticky surfaces. Sprinkle the cake when the icing, cream, or cream has not hardened.
- If you want to create an aquarium effect, use jelly filling and sprinkles. Pour in half of the jelly filling, freeze, top with sprinkles and fill with remaining jelly. Alternate layers of jelly with coarse sprinkles, and your cake will be incredibly beautiful!
- To decorate the sides of the cake with sprinkles, place the cake on a larger towel. Sprinkle the sprinkles onto the sides of the cake and onto the towel, then gently lift the sides of the cake while pressing down on the towel with the sprinkles.
Marmalade– an excellent material for decorating cakes. They can create beautiful designs in different colors. It is a flexible material and easy to work with.
Recipe
Ingredients: 50 grams of dark chocolate, marmalade of different colors, mastic or marzipan.
Cooking process: Take parchment paper and draw an image with a simple pencil. Roll out a thin layer of mastic or marzipan on parchment. Transfer the picture onto it by attaching a sheet of paper and rolling it out with a rolling pin. Melt 50 grams of dark chocolate, then place in a pastry syringe. Draw the outline of the design with chocolate. Melt the colored material in different containers; this can be done in a water bath or in the microwave. Fill the drawing with the desired colors of marmalade. Place in the refrigerator for 3 hours. You can also decorate the cake with unmelted marmalade of various shapes. You can make flowers from citrus slices and cubes. The surface of the cake to decorate with unmelted marmalade should be sticky, for example, buttercream, whipped cream.
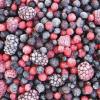
Sprinkles- This is a universal decoration for any cake. There are a huge number of sprinkles: in the form of flowers, stars, balls, squares, circles, butterflies... They have a very rich range of colors. You can find multi-colored, golden, silver sprinkles with pearlescent tints. Toppings made from nuts, chocolate, coconut, cookie crumbs and meringue are widely used.
Ways to decorate cakes with sprinkles
17.04.2018
Making a cake is a multi-stage process, one of the main stages of which is applying decor. The choice of available options is quite wide. The easiest to perform is sprinkling. Working with such material does not require special confectionery skills, but requires compliance with a number of conditions.
What is the topping made from?
The basic products for this decor are:
- Chocolate chips;
- Crushed nuts;
- Ready-made confectionery products - colored dragees, small figured toppings, beads, edible rhinestones;
- Coconut flakes;
- Powdered sugar;
- Cocoa;
- Waffle crumbs;
- Marshmallow marshmallow.
The basis of finished colored products are natural dietary fiber, vanillin, dyes, glucose syrup, food additives, sugar. Decorating a cake with sprinkles is also possible using products made from mastic. We are talking about stars, balls, and other decorative elements made using stencils.

Rules for working with sprinkles
Despite the apparent ease of use, applying decor without the appropriate experience often leads to negative results and the lack of a presentable appearance of the confectionery product. Therefore, it is better to study in advance how to beautifully decorate a cake with sprinkles, based on the following information:
- If the cake is covered with mastic-based topping, the final stage of decoration is coating the confectionery product with mirror glaze.
- The decoration fits perfectly on a surface that has not yet hardened and remains sticky.
- An interesting solution is a combination of sprinkles and jelly filling. If you plan to apply the gelatin mass to the surface of the cake in a thick layer, it is better to divide it into two parts. The top cake is coated first, after which the confectionery product is placed in the freezer to quickly harden. Then decorate the delicacy with coarse sprinkles and pour in the rest of the jelly. The result is an aquarium effect.
- Sprinkle decoration can also be used on the sides of cakes. To accomplish this difficult task, the dish with the assembled confectionery product is placed on a large towel and decoration is poured directly onto the fabric around the perimeter of the cake. Then they begin to carefully lift the “sides”, pressing them against the dessert. As it rises, loose decor is added.
- Sprinkles are widely used to create designs. Homemade or ready-made templates help with this. The simplest option for preparing a stencil is to cut out a circle from paper corresponding to the diameter of the cakes, and cut figures or a pattern into it. This technique requires an assistant who will hold the template at a short distance from the cake, while the second pastry chef pours the decoration thickly into the slots.
- The contrasting decor looks impressive. For example, a cake covered with white cream is sprinkled with nuts or cocoa, and almonds, coconut flakes or powdered sugar are applied to the dark chocolate glaze.
The tool for applying the topping is a sieve or paper cornet. In order for the confectionery product to look no worse than store-bought products, special attention is paid to the homogeneity of the mass.
How to make your own bulk decoration
The problem of how to decorate a cake with confectionery sprinkles can be solved quite simply in accordance with the above recommendations. If there is a desire to create a unique confectionery creation, proven home decor recipes are used.
Sugar sprinkles
To prepare it, granulated sugar is painted in different colors using natural or food coloring. Each portion of the resulting decoration is dried, after which all components are combined to obtain a rainbow palette.

Fondant sprinkles or nonpareil
Pre-prepare fondant in several tones. The resulting product is rubbed through a large sieve and scattered onto sheets of paper in one layer. After drying the decor in a warm place, the colors are mixed and used to decorate cakes.
Nut topping
Any nuts are suitable for its creation - walnuts, almonds, pistachios, hazelnuts, peanuts. The crushed kernels are pre-fried and cooled. In this form, they are ready to be used for decorating not only cakes, but also other creamy pastries.
Chocolate and crust crumbs
When planning how to decorate a cake with sprinkles in this way, pay attention to a number of points:
- The chocolate is preheated, then rubbed through a sieve directly over the baked goods.
- If the base material is leftover cakes made from shortbread or puff pastry, the pieces are first browned by frying. Then they are crushed with a knife or rolling pin and rubbed through a large sieve.
- The biscuit scraps are crushed using a grater, then sifted through a sieve and placed in the oven to fry until chocolate brown. This crumb looks interesting in combination with cocoa powder or powdered sugar.
Even an inexperienced pastry chef can work with sprinkles. It is especially convenient that it can be prepared from available products in the shortest possible time without special confectionery equipment. It is possible to combine such decor with glaze and mastic. But it is always the bulk decoration that becomes the final design element.
The more I look at the photos of cakes posted on the website, the more... I would rather help and advise - everything is done simply, and the appearance of your delicious products will be more attractive.
We all baked and bake cake layers. Is it worth repeating what everyone knows that a lot depends on the oven? Therefore, let's leave the oven alone and focus on our capabilities.
The recipe says to “roll out the dough into a cake with such and such a diameter” - we obediently roll it out. What's next? And, I remember, roll the dough onto a rolling pin and transfer it to a baking sheet (this is from my own experience, if anything, maybe there are no such recipes now). Well, we baked the cake - it didn’t turn out very round, and the edge was thicker here, thinner there - was it? It’s okay, then we’ll cover the edges with cream and hide all the flaws, no one will notice anything.
Until recently, I thought so too - well, it turned out delicious, we ate everything instantly, what’s there to talk about? Homemade cake, this is not a pastry shop.
...
This cake is posted here on Povarenka, but... actually, the resentment for this wonderful recipe was the impetus for this post. Unfortunately, simplifying a recipe is not always beneficial. I will give examples based on this honey cake, but this is for example only; any of us has enough everyday experience to understand what we are talking about.
Nowadays there are many convenient kitchen gadgets (not all of them are equally necessary and useful, by the way), but the most important thing is that we need a cake of a beautiful and correct shape
A cake ring and a springform pan of the same diameter (straight sides and fastened on the side with a clasp). (There is a one-piece form, where the bottom is pulled out upward, and the corrugated walls expand upward - this will not work).
The cake ring is a metal ring 3 centimeters high, without any special features.
While I didn’t have one, I took a regular baking dish made of aluminum foil of the diameter I needed (the walls should be straight) and simply cut out the bottom from there. (I live in Israel, we have many such forms, they cost pennies).
We took baking paper. Place it on the table (or on a silicone mat with the diameters drawn, they shine through the paper). *I’m not exactly a re-insurer... but I’m used to lubricating this paper, approximately a circle of the size I need, by eye - just oil from the refrigerator, easy to swipe over the paper and that’s it. There is practically no such oil there, it’s more out of habit*
The dough for the crust can be of any consistency - from liquid, which is poured, to one that can only be laid out in pieces - in short, your dough must be distributed in any way according to a given shape. There are no problems with the liquid dough - I poured it and that’s it. With thick honey, place it in pieces in a mold, like plasticine, press it with your hands; for thick and viscous honey cakes, lightly moisten the palms of your hands with water. Well, on the table on paper we laid out the dough of the size we need (approximately), try on the shape so that there is no “shortage” at the edges, let there be an excess, this is only a plus, it will be used for topping. Have you tried it on? Fine? We take this sheet and transfer it with the dough to a baking sheet, and only now place the mold on top. If the dough is liquid, then pour it directly into the mold onto paper on a baking sheet.
Honey skins bake very quickly. While the cake is baking, I have time to make 2-3 more pieces on paper for the cake.
The cake is baked - take out the baking sheet, remove the sheet of parchment along with the cake (I put this sheet on the wire rack). If I took a ring from an aluminum foil pan, then you just take it (the pan) with your hand (it’s not at all hot) and put it on the next cake layer, and then put it in the oven. If the metal ring is hot, don’t take it with your bare hand (that’s why I don’t like to take the springform pan itself, it’s tall and it’s easy to get burned).
What we see in the ring and what we don’t see without the ring - in the ring the dough rises like a sponge cake, the cake is 1.5-2 cm high, honestly, and has a perfect round shape.
We take a knife and cut out a biscuit along the edge of the metal ring (I don’t lubricate the ring with anything), it turns out to be a very beautiful cut, nice to look at. We put the trimmings from the outside into a bowl (it will be used for topping).
Without a ring - an ordinary pancake: in the center it is thicker, along the edges the thickness of the cake tends to zero, the circumference is far from ideal. Alas.
We baked some cakes. We made a cream (it’s better to make it according to the original recipe, on Povarenka the recipe is reduced). There should be a lot of cream. Plums - there should also be a lot of plums, cut into long thin strips, the 24 cm cake will be practically covered with them (plum - 2 layers, don’t forget). Nuts - I understand what they found and bought at the nearest supermarket, but after the second cake I went to the market to look for delicious nuts and found them. You are making a cake for yourself, for your family.
The last cake layer, which is usually used for topping - by this point it should already be clear to you that this particular cake layer (if there is still a need for it) may not be a round cake layer at all. Lay out the dough as much as there is left and bake it a little harder (but not to the point of “a little burnt” and do not overdry)
We begin to assemble the cake in a springform pan. You need to put a little cream on the bottom of the mold, just a drop, the bottom cake will stick and will not slide (this will be important when moving the cake somewhere). The cakes fit tightly into the mold. In general, if you think of weighing the empty container in which you will make the cream, then after preparing the cream, you can weigh this dish again and understand approximately how much cream you need for 1 layer (in this case: 4 layers + cream on the side surface, We count it as another cake layer, so we roughly divided the resulting weight into 5 parts). For the first cake, you take this cream from the bowl and understand how much it is, how many spoons, then you don’t have to weigh anything.
Now it’s important not to skimp, we calculated 200 g (this is an option for cream with vanilla pudding), which means you lay out these 200, spread them over the entire surface, don’t skimp on the edges! If some edge of the cake almost reaches the edge (it happens - we are all people, we are all human), then add more cream to this problem area. The cream will not escape from the mold anywhere, but it will even out absolutely everything. Second cake and so on. Upper layer. Again the right amount of cream.
In general, you get a lot of cream (which is just a plus) - it’s not too much, but just the right amount. For example, I prefer to put a layer of cream on the cake, plums or nuts on top of this cream, and add cream on top again, and then the next cake layer. For what? - then the cake will be well soaked from below too, I like it better this way. It would be naive to expect that the side of the dry cake that lies entirely on prunes will be as soft and rich as the one covered with cream.
Now put the cake in the refrigerator, even for a few minutes (5 is enough), just during this time we have time to make the topping - mix the crumbs and the remaining nuts. You can crumble the whole thing with a rolling pin (the nuts or cake scraps should be in a bag), but if you have a blender, it will turn out much faster, more beautiful and easier. If you don’t have a blender, it’s okay, a rolling pin will help out. The main difference, as I noticed, is that if you crush the nuts with a rolling pin, they may become a little oily. By the way, first I sort out the nuts (I learned from my own bitter experience, when I came across a piece of shell in a nut pie in a cafe, it was very unpleasant), rinse it, then dry it in the oven - it’s all quick.
After a few minutes, take the cake out of the refrigerator.
* Now another lyrical digression. You want to make the cake big, don’t you? Well, so that there is something to eat. I understand, I myself had a large family until the children grew up and moved away. But if you do everything correctly, your cake will be about 10 cm high. The sprinkles on the sides will also add at least 1.5 cm in diameter. And the question immediately arises: do you have a dish of this diameter? Not just a large dish, but so that the flat surface is no smaller than the diameter you need? (that is, the sides of the dish or plate no longer count) And if you decide to bring this beauty to work, then HOW will you transport this giant??? Therefore, I do not recommend increasing the diameter, the shape is 24 cm - and the cake will be huge, believe me *
We've reached the exciting stage - sprinkling (not tired of reading? The materiel will soon be over). I’ll say right away that this turned out to be the most time-consuming operation! Therefore, after the first such cake, I began to look for a solution.
I found it and will tell you now. If you have such a spatula for cream - good, if not - then a silicone spatula will also work, but it has a long handle, which is not so convenient for me personally.
Who decided to go for a walk like this, shall we continue?
Remove your prepared cake plate. (I bought a cardboard plate with a diameter of 28 cm from a disposable tableware store.) Place a sheet of parchment paper on the dish and now place your cake here, carefully holding it under the bottom (it is metal). Look what happened - the parchment near the cake rose like frills. Now, when you sprinkle the cake, nothing will spill on the table, everything remains in this paper.
Now, to make it convenient, take a large-diameter pan, turn it upside down, and place your dish with the cake on it (to make it convenient to rotate the cake and not have to bend over too much).
Scoop up crumbs with a cream spatula, bring the spatula to the cake and gently press the crumbs from bottom to top. Some of it crumbles, of course - nothing, again with a cream spatula you grab a portion of delicious crumbs at the base of the cake and again easily press them to the side surface of the cake. We turned the plate a little - and everything started again. On the table itself you don’t have any crumbs, and no waste at all (and remember earlier, the whole kitchen is covered in crumbs... how much to clean up later... brrrr)
Now you can easily transport the cake, move it with this paper, remove it at the very last moment.
The cake turns out very big. I remembered the math and recalculated everything into a smaller shape (it's easy).
Questions (I get asked all the time at work, so I answer right away):
What to do if you don’t have a cake pan or ring?
It will just spread on the sheet, that’s for sure. Better take a foil pan and cut out the bottom. If this is not possible, then you can get out of it this way: find a frying pan slightly larger than the required diameter (pay attention to the handle of the frying pan! So that it doesn’t cause excruciating pain when you try to squeeze the frying pan into the oven, you get the idea). Be sure to place a sheet of baking paper on the frying pan (cut out a circle). Once baked, cut out a circle of the required diameter from the baked cake (on a plate), just hold the knife perpendicularly so that the edges of the cake are even, then everything will turn out like in the picture above. But this is a completely extreme case.
If you don’t have a springform pan, try to find a paper one; they are usually straight in height and without any frills. If you didn’t find such a shape in the store - don’t panic, take the same baking paper, fold it in several layers, make yourself a ribbon - about 10 cm high, and now make yourself this shape, fasten a couple of sheets together so that the ribbon is long enough . (Circumference length for a shape with a diameter of 24 cm: P = Pi * d = 24 Pi ≈ 75.398208 cm, do not forget to add a couple of centimeters to your pattern so that the edge meets the edge and secure this edge. Girls, I didn’t find the symbol of the Greek letter Pi = 3.14 - geometry, 6th grade).
Why does honey cake with cream stay in the refrigerator for a day?- and it gets soaked. The analogy is literally how we defrost food from the freezer by placing it on the refrigerator shelf overnight, and in the morning it can be used. So is the cake - the cakes are soaked, but, figuratively speaking, they do not stick together into one pancake, which will happen if you just leave the cake on the table overnight (although the taste probably shouldn’t suffer).
The taste becomes completely different - bright, rich honey, sweet and sour.
(well, they also put it in the refrigerator for safety reasons, so that it doesn’t spoil if it’s hot, and the cake will retain its shape when cut. But I’m talking about honey cake with sour cream; other cakes may have their own nuances.)
There is another problem - if you have a child who is able to open the refrigerator on his own, then the inquisitive child will not be satisfied with just contemplating the cake in the refrigerator and will definitely find the opportunity to break off a piece to try. I place the cake in a low, large-diameter pan (28 cm) with a lid (with parchment paper the cake is very easy to move, don’t skimp on the paper) so that the cake doesn’t accidentally absorb any foreign odors, and so that the whole refrigerator doesn’t smell like honey.
About myself - I am never a cook or a pastry chef by profession.But an active user in the kitchenTherefore, the advice is more likely to come from the “News from the Fields” section.
At first I decided to post a cake recipe with photographs of each stage described here, but I thought that now I would bake it only on January 1, and by that time you will all have baked your own delicious cakes, so I decided to make a post now so that someone has time take advice. I’m new to the site, and of course I don’t know a lot - someone tell me if it’s possible to post a recipe similar to what’s on the site, but more detailed, or something, and with your own comments.
Thank you.
I wrote everything for a long time, but everything is done very quickly and without hassle
I wish everyone beautiful and delicious cakes!
Julia
P.S.
If I unknowingly violated the rules of the site, then do not attack in chorus and do not hit me with ladle, I will correct myself! It’s better to tell me where to read these rules and how to post links correctly.
Photos are not mine, taken from the Internet. because here I am only telling you what these kitchen tools are and how to use them.
Handmade chocolate decorations for cakes, pastries, cookies and other homemade baked goods are the pinnacle of a confectioner’s craft. Of course, you don’t have to overthink it and decorate the cake with chocolate the way your grandmothers did - just melt the bar with cream, and then coat the top and sides of the confectionery with this liquid mass. But you can try and make a chocolate decoration of simply unearthly beauty, similar to real masterpieces.
What kind of chocolate is suitable for decorating a cake?
When choosing which chocolate to make cake decorations from, purchase only a high-quality product. High-quality chocolate makes beautiful glossy decorations. Currently, chocolate glazes are used to make chocolate decorations, which are replaced with various equivalents of cocoa butter. These glazes are very convenient to use due to their significant fluidity, but in taste they are inferior to real chocolate - couverture.
Despite the long-standing domestic traditions of chocolate production, interest in this product on the part of consumers and producers is constantly growing, because chocolate can be used to make a variety of decorations for cakes and pastries: line drawings, three-dimensional figures, bas-reliefs, openwork details and much more. When decorating cakes with chocolate, you can give full rein to your imagination.
Popular trends in working with this product include “marble pattern”, “velor finishing”, “decals”.
As you can see in the photo, chocolate decorations can become real original sculptures:


Such compositions are not much inferior to those carved from stone or cast from metal.
DIY chocolate decorations (with photos)
Do-it-yourself chocolate decorations are made on the surface of cakes and pastries: geometric patterns, drawings of flowers and leaves, various drawings of thematic content. It is prohibited to use dyes other than those approved for use by the Ministry of Health. When decorating products, they use special techniques and various devices.

Chocolate decorations at home are made from chocolate candies and 100-gram bars. To decorate cakes with chocolate chips, the chocolate is cooled and then kept a little at a temperature of 25-30°C - then when cut with a knife, the chocolate curls into a beautiful tube. Heavily chilled chocolate crumbles, but soft chocolate does not produce shavings.
Look at the photo - decorating cakes with chocolate can be made in the form of twigs, trees, rockets, numbers, letters, antennae, outlines of animals and birds:


To do this, it is broken into pieces, melted in a water bath (so as not to burn) and poured into a small parchment cornet. A drawing is selected. Tracing paper or cellophane is placed on it and chocolate is deposited from the cornet along the visible contours. These homemade chocolate decorations are placed in a cold place, and after hardening, they are removed from the paper with a knife and transferred to a cake or pastry.

Before making a chocolate decoration in the form of a vertical pattern, a “leg” is pre-planted on which it will be fixed in the right place. Chocolate oak leaves are very elegant on the cake. To make them, tracing paper is applied to a drawing of a small oak leaf and a contour is first drawn from the cornet, and then the middle is filled in. With the back of a knife, a line is drawn in the middle of the leaf, and short oblique lines are drawn from it on the sides, thus imitating the veins of the leaf. After this, the remaining leaves are made.

It is not difficult to make decorations in the form of flat figures from chocolate for homemade cakes: for this, the melted product is poured onto parchment paper in a layer of 3 mm and various figures are cut out using recesses greased with vegetable oil. Chocolate for decorating a cake at home should not be hard, otherwise the figures will crumble.
Chocolate decorations for cake at home (with video)
To prepare three-dimensional chocolate decorations, one- and two-sided molds made of plaster, porcelain, clay, plastic and metal are used. Such forms are fastened together using clamps. The molds are thoroughly cleaned of chocolate residues and wiped dry with a clean cloth so that the figures and bas-reliefs can be easily separated, then they are heated to 30°C and filled with chocolate at a temperature of 29-30°C. Chocolate is poured into double-sided, interconnected molds through the bottom hole; the mold is shaken well for 2-3 minutes and turned over to avoid voids from air bubbles and to ensure that the chocolate is evenly distributed. After filling, place the mold with the hole down and pour out the remaining chocolate, leaving a layer of 2 to 4 mm on the inner walls.

If the shapes are large and have a complex pattern, the chocolate is applied with a brush. The filled forms are cooled in the refrigerator at a temperature of 10-12°C, and then the figures are cleaned from the seam formed at the gluing site.
The video “Chocolate Decorations” shows how various figures are made:
To make chocolate jewelry, you don’t have to come up with complex designs, but simply make a chocolate pyramid. Before making such a chocolate decoration for the cake, first draw the contours of the pyramid details on cardboard with a pencil and cut out a template. A design is syringed from the cornet: the lines of the design are thinner, the edges of the pyramid are thicker. To make the pyramid harder, add cocoa butter to the melted chocolate. The parts are cooled in the refrigerator for 1-2 hours, then their reverse sides are processed.
The pyramid is assembled like this: two parts are placed on a board with their flat sides facing each other and chocolate is squeezed out along the edges, the halves are compressed and cooled. Place it vertically on the cake and glue the remaining 3-4 parts to the sides, allow the pyramid to harden and additionally decorate the cake with marzipan and sugar mastic flowers.

As you can see in the photo, you can also make DIY chocolate decorations from a chocolate substitute. It is prepared from 15% cocoa, 45% butter, 40% powdered sugar and 10% (of the total mass) vanilla sugar. First, a quarter of all the butter is heated to 45°C, vanilla sugar and cocoa are added, then the rest of the butter is mixed with powdered sugar and all the products.

Decorations made from glaze can be immediately applied to the product or prepared for future use. In the second case, they are “planted” on sheets covered with parchment paper and dried for 12 hours at room temperature.

The simplest decoration is to apply straight or wavy lines to the surface of the product, smeared with cream, using a pastry comb. It can be made from tinplate, aluminum, plastic. The size and style of the comb teeth may vary.
The master class on decorating cakes with chocolate offered below contains interesting information about this product, reveals how tempering is carried out, as well as the technology for preparing figures, leaves, curls and shavings that will give a festive look to any cake.
Equipment for chocolate decorations on a cake: stencils and cornets for chocolate
Before making complex decorations for a chocolate cake, you need to stock up on special tools. First, you will need cornets or pastry depositor bags with a set of tubes. The cornet is made from tracing paper, parchment or other thick paper that does not absorb fat: cut out a right triangle and roll it into a conical tube. The protruding ends of the leaf are bent inward to secure the root. Its sharp end is cut depending on the pattern that they want to get. The cornet is filled halfway with cream or glaze and closed tightly so that when pressed, the cream or glaze is “deposited” only from the bottom hole. With the help of a cornet, inscriptions, dots and subtle elegant designs and flowers are applied.

To make chocolate decorations, you can make a piping bag. To make it, use thick fabric (tick eraser is best). The bag has a cone shape; various tubes are inserted into its narrow end. A new bag must be boiled before use. After work, the jigging bags are washed in warm water mixed with baking soda, boiled for 3–5 minutes, dried and stored in a specially designated place.

Depositing tubes for making decorations for chocolate cakes are made in the form of a cone, the end of which has a shaped hole, from which the cream is deposited in the form of various decorations. Sometimes a confectionery depositing bag is used, into the narrow end of which a conical ring with a screw thread is inserted; tubes of different styles can then be screwed onto it.
To fill a pastry depositor bag with cream, hold it with your left hand, unfold the bag and place the cream with a spatula or spoon to fill 1/2 of its volume. The cream must be placed tightly, as remaining air can ruin the design. With both hands, connect the edges of the bag and, holding it with your right hand, “pipe” the cream, holding the narrow end of the pastry bag with your left.
A variety of chocolate designs for decorating cakes is achieved not only by different styles of tubes, but also by zigzag or wave-like movements of the cornet or depositing bag, slow or instantaneous changes in the pressure force with the right hand, the angle of inclination relative to the product being decorated, the distance from the product, etc.
Before completing any design for chocolate decorations, you should stop pressing the pastry bag and use the end of the tube to make a sharp, short movement forward along the design.
Various openwork chocolate decorations are made by depositing cream from metal shaped tubes inserted into a depositing bag. A set of 10–12 tubes with different cut configurations allows you to make all the variety of decorations needed for decorating pastries and cakes. But most often they use tubes with smooth and straight, jagged and wedge-shaped cuts.

Stencils for decorating cakes with chocolate can be useful, especially when you need a lot of decoration elements (for a festive banquet or children's table). You can also create a hybrid: for example, make some parts of the composition using a stencil for chocolate decorations, and others by original cutting. The stencil for chocolate decorations has a metal base. Place it on appropriately prepared raw materials and press firmly, cutting through the flesh in the shape of a butterfly, leaf, fungus or any other figure.
Here you can see a photo of the “Chocolate Decorating Tools” that you will need to create the drawings:

Decorating the sides of cakes with liquid chocolate cream with your own hands (with photos and videos)
To decorate cakes with chocolate cream, use only freshly whipped product; standing cream will result in patterns without gloss and pockmarked.

When decorating a cake with liquid chocolate, lines - smooth, zigzag, wavy - are drawn with a pastry comb heated in hot water, lightly pressing it against the smooth edge of the cream. Flowers, figures and patterns are made by squeezing cream out of shaped tubes inserted into a depositing bag. The most delicate drawings and figures of a certain shape or color are made using a cornet, the narrow end of which is either cut off or a shaped tube is inserted into it.

When making openwork chocolate decorations for cakes, the cornet is filled halfway with cream and closed tightly so that when pressed, the cream comes out only at the cut point. It is better not to hold the cornet with cream in your hands for a long time: the cream heats up by hand, becomes liquid and the drawings turn out uneven. After twisting, the cornet is freed from the remaining cream.
To decorate a cake with chocolate with your own hands, fill the depositing bag as follows: unscrew the wide end of the bag so that it rests on the left hand, and with your right hand, using a spoon, fill the bag with cream to 1/2 of the volume. There should be as little air as possible left in the bag, as it spoils the drawings. Then, with both hands, connect the edges of the wide end of the bag and, pinching it with your right hand, release the cream, supporting the narrow end with your left hand.

When making chocolate cake decorations at home, depending on the wavy or zigzag movements of the cornet or bag, slow or instantaneous changes in pressure with the right hand, changes in the angle of inclination relative to the product, and changes in the distance from the surface of the product, a variety of cream designs are achieved. After completing the beautiful chocolate decorations, you need to stop pressing on the bag or cornet and use the end of the tube to make a short movement forward from you along the design, then the rest of the cream will fall in an inconspicuous smear. If you lift the bag or cornet up, then a cone of cream will remain in the picture.

To prepare small chocolate decorations for the cake, to make dots and inscriptions, the narrow end of the cornet is held close to the surface of the product to be decorated. You can fill bags and cornets in advance with creams of different colors. This will make the chocolate decor for decorating the cake more varied and vibrant.

If you need to make a rose from cream, first cut out a small cake from the sponge cake (or take candied fruit, profiterole, etc.) - the core of the rose. The core is secured on a stick with a pointed end and a cork placed on it or on a table fork. In the left hand they hold a stick with a core, in the right - a pastry bag with a straw. By turning the stick, cream is squeezed onto the core. When the rose is ready, remove it from the stick with a spatula or fork, holding it with the fingers of your left hand, and place it on the cake or pastry.
As you can see in the photo, when decorating a cake with chocolate at home, you can weave a basket of the same or different colors:

The basket can also be made from sponge cake (short pastry), gluing the layers with chocolate cream or fruit filling. The basket is placed on a stand (for example, a plywood circle) with the wide side down and, lifting one side, a weave of cream is applied. When the cream has hardened, the basket is placed on the cake. A handle is made from caramel or special dough (composition: flour, powdered sugar and egg white) on top of the basket. Flowers or sweets are placed in the basket.

To decorate the sides of the cake with chocolate, you can decorate them with borders of cream. By the way, borders are made before all other cake decorations. Borders serve not only as decoration, but also cover gaps, cracks, and smooth out the edges of the cake. They are mainly made using a smooth straight-cut tube or a tube with fine teeth.
The video “DIY Chocolate Decorations” shows various confectionery techniques:
How to decorate a cake with chocolate with your own hands: making flowers
Flower-shaped chocolate cake decorations look very nice. In addition to roses, carnations are often made. They are syringed from a flat tube with an oblique cut. The sharp corner of the tube is placed motionless on the surface of the cake or pastry and they begin to squeeze out the cream, turning the opposite end of the tube 180°C around the motionless end with wave-like movements. Exactly the same, but in the opposite direction they “assemble” the second row of petals, etc.

It is advisable to complement cream flowers with leaves. They are planted from tubes with a wedge-shaped cut of various diameters. The leaves can be green, brown, yellow and even white.
You can make a border or an entire design entirely from leaves. Leaves look especially good on small cakes. Words, names, numbers, congratulations and wishes are often written on cakes and even pastries. For inscriptions to be expressive, there must be a contrast between the inscription and the background. For example, you cannot write chocolate on chocolate or write with white cream on white icing.

The inscriptions are syringed from a small cornet with a very narrow round cut or using a metal “pencil” tube. Protein, custard and butter creams of various colors and shades are used. But there should not be even the smallest lumps in it, otherwise it will get stuck at the exit from the tube or cornet, and you will get uneven, broken lines. You can also write inscriptions using two-color cream. In this case, the cornet is filled with cream of two colors in longitudinal stripes.
Watch the video “Chocolate Cake Decorations” for some fresh ideas:
How to make a cake decoration using tempered chocolate
From tempered chocolate you can make a variety of decorations for cakes and pastries - full-volume figures, bas-reliefs, flat thin figures, “jigging” ones, etc.
For full-volume figures, it is better to use metal molds of two halves with clamps. When pouring chocolate, the mold and the chocolate must be at the same temperature. Chocolate is poured through the bottom hole of the mold and shaken for 2-3 minutes so that the chocolate is completely distributed over all patterns. Then the excess chocolate is poured out. A layer of chocolate 3–4 mm thick forms on the inner walls of the mold. After the chocolate has cooled and hardened, the mold is released from the clamps, the figure is opened and the figure is removed. Most often, bas-reliefs are made from chocolate.

To obtain flat thin figures, tempered chocolate is poured onto parchment in a layer of 2–3 mm, allowed to harden a little, and the figures are cut out with a notch.
To “deposit,” tempered chocolate is placed in a cornet and “deposited” on parchment in the form of continuous patterns and so-called tendrils. Tempered chocolate, cast into a bar and then cooled until almost completely hardened, is cut into thin wide chips with a knife, which roll into tubes when dropped.
Making chocolate figures for cake decoration
Chocolate is an excellent material for decorating cookies or cakes; it will add a festive look to any baked goods. To decorate the cake, it is better to use a chocolate mixture. It hardens at room temperature and melts easily in a water bath.
Line a baking sheet with parchment and lightly grease it with vegetable oil. Break the chocolate into small pieces. Place it in a water bath and melt without water. Pour onto the parchment, guiding with a round-tipped knife to form a thick, even layer. Leave in a cool place until the chocolate is almost completely set. Use a knife or dough cutter (star, flower, etc.) to cut out shapes. They should be stored in a cool, dry place.

Chocolate squares- a simple and effective way to decorate a cake or holiday dessert. Line a baking sheet with foil. Spread 200 g of melted chocolate in an even layer and gently move the fork to create a wave effect (make sure the tines of the fork do not touch the bottom of the baking tray). Refrigerate until the chocolate is half set. Using a sharp knife and a ruler, cut the chocolate into squares with a side of approximately 6 cm. Place the baking tray with chocolate decorations in the refrigerator until they completely harden. Remove the foil. Gently press the chocolate squares onto the top and sides of the frosted cake. They can also be used as a garnish for ice cream desserts.
Chocolate decor for decorating a cake: grated shavings, crumbs, petals and curls

Chocolate chips and crumbs. To decorate the cake with grated chocolate, use a sharp knife to cut off the shavings from the chocolate bar. It is better to remove the shavings over a plate, using smooth movements. Before decorating the cake with grated chocolate, it should be warmed up, but only enough so that it is easy to work with. Leave the chocolate in a warm place for 10-15 minutes. You can spoon the shavings onto the cake or shake them off. Decorating with chocolate chips is done in exactly the same way, only it is rubbed finer.

Chocolate curls. Melt the chocolate in a bowl over a water bath. Spread a thin layer on a smooth board. Set aside until the chocolate is almost set. Pull the blade of a large wide knife towards you along the entire length of the chocolate, getting long curls.

Chocolate petals. Cut the foil into squares. Melt the chocolate in a water bath, then cool slightly. Place the square of foil on your palm. Using a spatula or spoon, spread a thin layer of chocolate onto the foil. Form a petal. While it is still soft, lift your fingers slightly under the foil to slightly bend the petal, giving it a natural shape. Leave to cool. When the chocolate has completely hardened, remove the foil. Using melted chocolate you can make a flower from the petals.
Homemade chocolate cream dessert
Chocolate cream

Ingredients:
- 100 g chocolate by weight,
- 1/2 cup milk,
- 3 yolks,
- 4 squirrels,
- 2 tbsp. spoons of powdered sugar.
Pour milk over the chocolate broken into pieces and place in the oven to melt. Then grind it with a spoon, gradually adding one yolk at a time until a fluffy mass is formed. Beat the whites into a thick foam and carefully mix with the chocolate mixture. Place the cream in glasses and sprinkle grated chocolate mixed with powdered sugar on top.
Note. This cream must be prepared shortly before serving and kept in the refrigerator, otherwise the whites will fall off and the dish will be spoiled.
Cocoa karem

Ingredients:
- 400 g butter (unsalted) butter,
- 250 ml milk,
- 200 g sugar,
- 3–4 tbsp. spoons of cocoa powder,
- 2 eggs.
Heat the milk in a water bath, add cocoa, stir, pour in the eggs mashed with sugar, cook until thickened, stirring occasionally, then remove and cool.
Beat softened butter until white. Then add the cooled mixture to it. Beat the cream until it reaches a homogeneous consistency.
Custard chocolate cream

Ingredients:
- 1 cup flour,
- 1/2 cup milk,
- 1/2 cup granulated sugar,
- 1 tbsp. l. cocoa powder,
- 50 g butter.
Cooking method. Bring a homogeneous mixture of cocoa powder, granulated sugar, flour, milk and butter to a boil over low heat, stirring constantly. The cream will be ready after it boils and thickens.
How to prepare chocolate icing for cake decoration (with photo)
Recipe No. 1
The easiest way to prepare chocolate glaze is from chocolate. This product can be used as a cream for cakes, or simply spread on cookies.
Ingredients:
- 200 g chocolate,
- 100 g of water,
- 25 g butter.
Dissolve the chocolate and water in a water bath. Mix with butter. Spread the warm glaze over the cake and let cool.
Recipe No. 2
To make this glaze you only need 2 ingredients.
Ingredients:
- dark chocolate (at least 56%) – 0.6 kg (3 large bars),
- “Krestyanskoye” oil – 0.3 kg.
Chocolate icing from chocolate is prepared in a water bath, so first we will select containers: you will need 2 of them, of such a volume that one is immersed in the other, but at the same time, water poured into a larger container should not be poured into a smaller one.
So, set up the containers, pour some water into the larger one and put it on the fire. When the water is hot enough, melt the butter - it melts easier and faster. Gradually add finely chopped chocolate to the liquid butter. Stir continuously, because the mixture quickly thickens and begins to burn at the walls. When all the chocolate has melted and the glaze has become homogeneous, it is ready.
Thus, from butter and chocolate, a mirror-like chocolate glaze is obtained. However, this is a fairly high-calorie product.
As you can see in the photo, when decorating cakes with such chocolate glaze, it glitters very beautifully:

Chocolate glaze made from cocoa and sour cream

Ingredients:
- sugar – ½ cup;
- sour cream with a fat content of at least 20% - 150 g;
- vanillin – 2 sachets;
- cocoa powder – 4 tbsp. spoons.
Preparation:
Since it is not recommended to heat sour cream, it is better to grind the sugar into powder - this way it will dissolve more easily. Mix the dry products: grind cocoa powder with powder and vanilla. If you use vanilla sugar, grind it too. Add sour cream to the mixture a little at a time to avoid lumps. Mix thoroughly until a smooth, shiny, homogeneous mass is obtained. You can use a mixer, then the chocolate icing for the cake will be more airy.
You can make a rich glaze by adding cocoa to the chocolate - this recipe is suitable if you cannot find chocolate with a high cocoa content. We'll tell you how to make chocolate icing from cocoa powder, chocolate and milk.
Chocolate and cocoa glaze

Ingredients:
- mirror chocolate glaze;
- cocoa powder – 4 tbsp. spoons;
- sugar – 1/3 cup;
- milk – ½ cup;
- dark chocolate – 1 bar;
- butter – ¼ pack.
Preparation:
Heat the milk and dissolve the butter with it. Gradually add chocolate chips, cook until ingredients are completely combined, stir. Mix sugar with cocoa and pour in the milk-chocolate mixture in a thin stream. Grind until the sugar dissolves. This chocolate glaze must be applied very hot for decoration.
Light chocolate icing for decorating cakes and desserts
What to do if you need to decorate a dessert, but at the same time you want fewer calories. To do this, you need to cook a light cocoa glaze.

Ingredients:
- sugar – 1 glass;
- water – 0.5 cups;
- cocoa powder – 2-3 tbsp. spoons.
Preparation:
To make this glaze for decorating desserts with chocolate, first of all we prepare the syrup: add sugar to hot water and cook the mixture over low heat for so long as to get a drop that does not spread on the nail. As soon as the syrup is cooked, add cocoa little by little, thoroughly grinding it with the liquid. Quite quickly the sugar will begin to crystallize at the walls. If you don't rub the mixture, it will burn, so be careful and careful. The glaze hardens quickly, so it must be applied warm.
It is not necessary to cook cream to decorate dessert. If the cake contains jelly, do not add a hot chocolate layer. In this case, we will prepare the glaze without heat treatment.
How to make chocolate fondant for cake decoration

Ingredients:
- 75 g softened butter or margarine;
- 225 g powdered sugar;
- 3 tbsp. l. water;
- 2 tbsp. l. cocoa.
To prepare chocolate fudge, mix 1 tbsp. l. hot water and 1 tbsp. l. cocoa, cool.
Mix butter and powdered sugar. Beat with a mixer on low speed, gradually adding water until the fudge is smooth.
Frost the cake with the chocolate decoration prepared according to this recipe and decorate it in accordance with the theme of the holiday.
How to melt chocolate to decorate a cake
To make a product or decoration from chocolate, you need to prepare it, that is, melt it. There are several nuances in how to properly melt chocolate to decorate a cake. Several methods can be used.

First way How to melt chocolate for decoration - use the microwave, it's very simple.
Second way How to melt chocolate to decorate a cake - use a water bath. To do this, place the container with chocolate in a pan of hot (not boiling!) water.
Third way How to properly melt chocolate for decoration - use a double boiler. You can also melt chocolate in it.
Fourth method - oven. Heat it to 60-70 degrees, place a container with chocolate there for 10-15 minutes. The fifth method is a steam bath. The container with chocolate should be kept over boiling water.
A liquid mass is not always required, so the process will need to be controlled.
Chocolate doesn't like sudden changes in temperature, so don't start melting it cold. Wait for the product to reach room temperature.
The melting point of white or milk chocolate is 45 degrees. But bitter dark chocolate will melt only at 50-55 degrees Celsius.
How to make openwork chocolate designs to decorate a cake
Openwork designs are an excellent option for decorating a cake.
You will need a brush (it is better to buy a special culinary brush, it is simple and convenient to work with), a pastry bag or plastic bag, dark and white chocolate.

To start, you will need to cover the entire cake with chocolate, which you will use for the background (other chocolate will be used to create the designs). To do this, melt it to a liquid state in any way. Coat the cake with the mixture using a pastry brush.
Let the glaze dry completely.
Start melting the other chocolate. It should also be quite liquid.
Transfer the chocolate to a piping bag. You can replace it with a regular plastic bag by making a small hole in its lower corner.
Start creating! Draw different patterns, show your imagination!
Master class on making butterfly decoration for a cake
Prepare everything you need in advance: chocolate (you can use white or dark), cling film and a plastic bag (or pastry bag), cutting board or any other hard surface.
What do we have to do?
Melt the chocolate in any way until liquid, transfer it to a pastry bag (or a plastic bag with a hole).

Place cling film on a cutting board.
Start drawing butterflies with liquid chocolate on cling film. If you use two chocolates (white and dark), the decoration will be more impressive.
When the drawing has hardened a little, move it to the refrigerator until completely hardened.
Remove the jewelry from the refrigerator and carefully peel off the film.
Place your butterflies on the cake.
Decorating the cake with balls of chocolate, nuts and cookies
Chocolate balls with nuts

Ingredients:
- cocoa 3 cup;
- sugar 1 glass;
- milk 3 cup;
- butter 150 gr;
- walnut 150 gr;
- shortbread cookies 400 gr;
- coconut flakes 1 sachet;
- egg 1 pc.;
- cognac 1 tbsp. l;
- vanillin 1/2 tsp.
Preparation:
To decorate the cake with nuts and chocolate balls, mix cocoa, sugar and milk. Add chopped butter and put on fire. We are waiting for it to boil. Let cool.
Add the egg, vanilla, cognac and beat well.
Chop the nuts in a coffee grinder (you can roast them first, it tastes better) and add to the mixture.
Grind the cookies (a meat grinder is your friend here) and add to the mixture.
Mix well and make balls. We envelop each ball in coconut flakes. Beautiful!
Place the balls in a pyramid on a plate and place in the refrigerator for 3-4 hours.
Bon appetit!
Chocolate balls with cookies

Ingredients
- 250 g cookies;
- 150 g dark chocolate;
- 50 g butter;
- 2 tbsp. l. Sahara;
- 1 glass of milk;
- coconut flakes or colored dragee.
Grind the cookies. Melt the chocolate and butter in a double boiler or in the microwave. Add milk and sugar, stir until a homogeneous mixture is obtained. Add crushed cookies. Stir and make balls from the resulting dough. Roll the finished balls in coconut flakes or colored dragees. Chocolate balls for decorating the cake should be placed in the refrigerator for several hours.
The selection of photos “Decorating a cake with chocolate at home” clearly illustrates all the above recipes:


Chocolate chips for decorating cakes
If you grind the chocolate on a grater, small strips, separated from the bar, will twist into spirals and are perfect for the role of the top layer. Moreover, when improvising with colors (black, milky and white), interesting combinations come out, and even entire edible paintings. Before you get to work, place the chocolate in a warm place, softening it a little. You can also create curls by hand: you need to get used to cutting thin strips with a well-sharpened knife.
And for the sake of perfectly even chips, the technique will have to be adjusted. To do this, you will need ready-made chocolate icing, which must be applied in separate strokes to the grooved surface and placed in the freezer to harden.
When the mixture has set, carefully scrape the mixture and transfer it to the cake. Don't stop your imagination with a solid background. Such small particles are also used to create works of art. It is important to place the chocolate decorations on the cake quickly so that they do not have time to melt on your fingers or stick to each other.
Chocolate cookie decoration

Ingredients:
- 1 part vanilla shortbread dough;
- ground cinnamon added to flour;
- 400 g of a mixture of different whole nuts;
- 175 g plain chocolate, broken into pieces;
- 175 g milk chocolate, broken into pieces.
Preheat the oven to 180°C. Grease the base and sides of 2 short pans and line each with a sheet of parchment. Oil the paper.
Divide the dough between the pans and pack it tightly into the pans. Sprinkle with nuts so they are evenly distributed. Press them into the dough with your hands until they hold tightly.
Bake for 40 minutes until the nuts and edges of the cakes are golden. Carefully remove them from the molds and transfer to a wire rack.
Melt the milk and dark chocolate in separate bowls set over pans of simmering water. Leaving the cookies on the paper, carefully cut each cake into strips 2 cm wide.
Place the pieces on the rack so they are 1-2cm apart and drizzle a thin stream of melted dark chocolate using a dessert spoon. Then drizzle milk chocolate on top and leave in a cool place until the chocolate hardens. Cut each strip in half lengthwise.
Cookies with chocolate decorations can be stored for about a week in a tightly sealed container.
Recipe for poured chocolate figures for cake decoration
Such figures can be poured from melted chocolate using generally accepted casting technology. Just having a form is enough. We purchase silicone molds of the desired theme in the confectionery department and fill them with melted chocolate, cool, cool to a solid state, remove from the molds, turning them inside out. If you do not need large chocolate products, pour the chocolate into the molds in a thinner layer. Once poured, smooth the surface with a thin spatula or table knife.
In the absence of bulk molds, you can use shaped recesses, which we usually use for molding cookies or gingerbread. Place a sheet of parchment paper on a flat tray, place the molds and pour chocolate into them in a layer of the thickness you want, trying to get into the center of the cavity so that the chocolate does not stick to its sides above the intended layer. When using indentations, it is better for the chocolate mass to be thicker - let the melted chocolate thicken a little so that it does not spread too much from under the indentations on the parchment. After cooling the chocolate figures to a solid state, carefully squeeze them out of the cut-out molds, keeping your hands cool and wearing gloves so as not to leave fingerprints. Until the figures have completely hardened, they can be further decorated - notches applied with a knife or a special cutter, or pressed with mesh or other textured objects, according to the intended decor. Anything you press onto the surface of the chocolate will leave its mark on it. Such massive chocolate figures are used in confectionery compositions if they are intended to be picked up, for example, to fill baskets or to create a voluminous center of a confectionery composition.
And in conclusion, another video “How to decorate a cake with chocolate”, which will help you cope with this difficult task perfectly: