There are many original ideas for a gift and congratulations, today we will introduce you to one of them in detail. Who hasn't eaten regular pastry cake? Yes all! But not every person received a hand-made cardboard treat with wishes as a gift.
You ask, how to make such a cake with your own hands? Very simple.
The idea of this cake is that each piece of it is a kind of box in which you can put various gifts: from sweets for children to jewelry for your loved ones. You can write wishes and see who got what. Yes, and you can decorate it in different ways.
Cardboard cake: master class with photos
So, let's master our master class for beginners.
What you need to prepare:
- Cardboard;
- Scissors and stationery knife;
- Glue;
- Brush;
- Pencil;
- Ruler;
- Decor elements.
To make it easier to make such a cake from cardboard, a template with the dimensions of one piece is given below.

You just need to print this template, it will be the right size, but, if desired, the pieces can be made smaller or larger.
Then cut along the contour. In order for the fold lines to be perfectly straight, you need to lightly trace them using a ruler with the blunt side of a knife, and then bend them.


Now you need to glue the pieces along the indicated lines. In each piece of cake you can put a card with a wish, a gift, a souvenir, candy and anything else you want. Close, but glue!


The cardboard cake with wishes is almost ready, all that remains is to decorate it with decorations.
This is how we did it: put it under each piece openwork napkin and tie it with a ribbon. Secure the ribbon with a drop of glue at the front so that it does not slip, and tie it with a bow at the back.


Glue a flower bud onto a piece of cardboard cake, decorate with beads and gold cord. You can also make your own decor using a wide variety of elements: buttons, rhinestones, ribbons, as well as polymer clay parts.


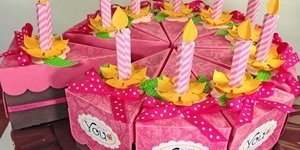
Of course, the decor should correspond to the holiday, for example, this one is suitable as a gift for a wedding or a woman. By changing the color of the pieces and the decor, you can make a children's cake or a cake for a man. In general, give free rein to your imagination, and you will get an extraordinary designer cake. For ideas for decorating a paper cake, see the photo below.
This cake consists of 12 pieces. That's all, the master class on making such a wonderful gift has come to an end.


Great idea to pack gifts in a cake! Calculating the number of guests is not at all difficult and everyone will get something to remember sweet gift, surprise, wish or even a comic horoscope (prediction)! Make this cake for an anniversary or birthday, for kindergarten or school!

Photo: bigfootandpickleface.blogspot.com
How to make a paper cake
For a paper cake, templates are usually used that are transferred to thick colored or decorative paper. For wedges, 3 types of template are used - template No. 1 and template No. 2 with a lock and template No. 3 with removable lid. In template No. 3, you can make different variations of the lid - straight, with a ruffle or teeth.
To download the template, right-click on the image and select save as
Step 1
Print the template or transfer it to thick paper.
Step 2
Cut out the template. Make folds along the dotted lines.

Step 3
Glue the cut and folded template.

Step 4
Decorate to your taste.

Step 5
Fill each wedge with a small treat, surprise, wish or congratulation.
Step 6
Fold the cake - usually 12 wedges are made for one cake (first tier). You can secure them with tape. Don't forget to make a cake stand out of cardboard.
Paper cake examples
The cake can be made one, two-tiered or even multi-tiered!


Photo:kimberlyskards.blogspot.com
Photo:flickr.com by daisysanddots
The paper one can be plain or multi-colored, you can decorate it as you please - with various figures, paper flowers, ribbons or serpentine. A cake decorated with flowers made using the quilling technique looks very impressive.

Photo:anitameade.typepad.com


Photo: flickr.com by daisysanddots

maearmstrong.blogspot.com

Photo: flickr.com by daisysanddots

Gorgeous piece of cake - great way give a small gift to a dear or loved one, or make a pleasant surprise for a friend.

Photo: www.etsy.com by imeondesign

Photo: www.etsy.com in USD

Photo: www.etsy.com by imeondesign

Photo: www.etsy.com by imeondesign

Photo: www.etsy.com by imeondesign

Photo: www.etsy.com by imeondesign

Photo: www.splitcoaststampers.com
Sometimes you really want to surprise your friends or family and please them with something unusual on a special day. Moreover, gifts made from the heart and with your own hands are always appreciated and accepted with gratitude and delight. One of these interesting surprises is cake. What's unusual here, you ask. And the fact that a homemade cake will be completely inedible, but with a lot of good congratulations and pleasant little things. A cardboard cake with DIY wishes is an excellent gift for any occasion, both for adults and children.

Each piece of cake contains an original congratulation and a little surprise, which will definitely cheer up its owner, because human psychology is designed in such a way that opening gifts and receiving surprises is a guaranteed surge in happiness hormones. And such a cake will certainly appeal to those who don’t eat sweets or watch their figure.
This DIY cake is perfect for themed parties or children's parties. It is enough to count the number of guests, make the required number of pieces, put a surprise in each wish and conduct a kind of lottery or fortune-telling - what wish will come true for the one who pulled out this or that piece. Without a doubt, the joy from such an event will know no bounds!
In this article we will learn how to make a cake out of cardboard with your own hands, what tools and materials will be useful, and what wishes and gifts you can leave as a surprise.
Cardboard sweets
So, for work you will need: thin cardboard, scissors, glue, ruler and pencil, for decoration - colored paper, ribbons, beads and everything that your imagination suggests.
The cake making tutorial begins with creating a drawing of each piece.
You can use a ready-made cardboard cake template with dimensions, for example, like this:

Or print out the following template on paper:

We transfer the stencil to cardboard or draw the part ourselves, and then cut it out along the contour.

For convenience, you can immediately use colored cardboard - you will need 13 sheets of different colors. Now in stationery stores you can find material not only in a variety of bright colors, but also textured, iridescent, holographic and other types of cardboard. This will make the cake look very impressive.
Along the dotted lines, bend the workpiece towards the inside of the cardboard.

Glue the edges together and make a small cutout according to the following pattern.

We leave the wide side of the piece open in order to fill it with wishes and surprises.

Now comes the fun part – filling the contents of the cake. We put a note with a wish in each piece. You can limit yourself to only congratulations, but the greatest delight will be caused by small surprise gifts that correspond to every wish.


We close the cake pieces using the slot in the piece as a lock. And then we decorate the cake with ribbons or beads.


Decoration options can be very different. Below are a few photos with cake design ideas:


Polymer clay or plasticine is also great for creating the effect of real cream on a cake, or for placing and fixing small candles. But you need to be careful when using real candles and follow fire safety rules.
By the way, cake pieces can be made in the form of triangular boxes with a lid, for example, like these:

Options for wishes can be very diverse, ranging from standard to the most personal and special. Here is an example of some congratulations and good parting words:
- “Sweet Life” and add some chocolate or candy.
- “Vivid impressions” - colored pencils, crayons or multi-colored candies are suitable.
- “Great luck” - symbolizes dice or a lottery ticket.
- “Untold wealth” - of course, money or coins.
- “Have a good rest” - a shell or magnet.
- “Good health” - vitamins, ascorbic acid or hematogen are suitable.
- “Boundless love” - a small heart.
- “Home warmth” - you can put a candle.
- “Additions to the family” - a small doll or pacifier.
- “Pep” - coffee beans in beautiful packaging are perfect.
And many more different surprises and gifts can be invented for any holiday.
Video on the topic of the article
More interesting ideas Making and decorating a cardboard cake with wishes can be seen in the following videos.
Nowadays it is very difficult to surprise the birthday boy with a large square box in wrapping paper. Gifts are given in boxes, gift bags and parcels. There are many gift wrapping options, but most of them are simple and well-known. To surprise and amaze the recipient of the gift, you can make a cardboard cake with wishes from individual pieces, in each of which you can hide small gifts and congratulations. You can place sweets, jewelry or money in miniature crafts.
Of course, we will not make a fake cake imitating real cake, as in theatrical props. Or, as they say in the army, a size-weight model. A – a voluminous surprise cake! It can be used as a toy cake for doll tea parties, or kindergarten. Or it can be used as gift wrapping. A separate surprise can be hidden in each sector of such a cake. Ideas for creating such a wonderful cake are presented in the photo gallery in our article; here you will also find a template with a folding pattern already applied to it. Printing will not take much time, so you can start making it almost immediately after reading the article.
What you need to create a cardboard cake with own design?
- colored cardboard;
- scissors;
- glue stick;
- decorative elements (sequins, rhinestones, beads, ribbons, lace, coffee beans, cereals, artificial flowers, etc.).
This cake will become excellent packaging gift for any occasion. On New Year you can put sweets and gifts for children in the cake and decorate it festive table, for a birthday, put money, decorations and wishes in the package, for Valentine's Day - declarations of love.
The list goes on and on, and the options for filling the cake are limited only by your imagination.
Gallery: cardboard cake (25 photos)


How to make a cake with wishes: master class
Don't worry about how to make the box. For the cake you don’t need to calculate the size and draw lines on paper with your own hands, you just need to print it simple template.

The craft consists of two parts: "dough" and "cream". After printing the template, you can read a simple master class and start creating an extraordinary sweet pastries with your own hands.
- Cut the template along the contour.
- Place the bottom of the cake (without the wavy edges) onto the card of your choice.
- Using non-writing paste or a ruler, make folds along the dotted lines. The folds at the bottom of the cake are outward, and the folds are inward at the top.
- Apply glue to the areas marked with a cross ("X").
- Glue each piece separately.
- Place the top part on the bottom and glue the two parts together.
- Make 12 pieces of cake in the same way.
- Place all 12 pieces of cake on a cardboard circle or tray and tie with satin ribbon.
- Decorate each piece with rhinestones, beads or flowers.
How to decorate a cardboard cake
Lace and hearts. Such a romantic craft will be a wonderful gift for... wedding or Valentine's Day. To design the box you will need:
- lace ribbons,
- shiny pink cardboard
- glitter glue,
- thin white satin ribbons,
- white beads
- thin silver ribbon.
 It is best to choose a beige or light blue color for individual pieces, so the cake will look delicate and elegant. Following simple master class, Can Beautiful decorate the craft. The cream is recreated using white lace.
The best option is alternation: glue the lace through a piece. Glue hearts from the pieces without lace pink glitter paper. Decorate the entire package with silver dots made of shiny glue and white bows made of satin ribbon. Add bows with white beads. Tie the entire cake with a satin ribbon.
 Butterflies. This option looks very advantageous at children's parties. For it you will need a butterfly template (the insect can be drawn by hand). After the template is transferred to paper, the butterflies need to be cut out. You only need to glue them on one wing or in the center of the body (this way they will look three-dimensional), decorating each individual piece of cardboard crafts.
The butterfly can be painted with felt-tip pens or glitter glue. The center of the cake can be decorated with a small bouquet of artificial flowers, which can be made from colored corrugated paper (a master class on making flowers can be found on the Internet).
 Various pieces. This cake is perfect for big company. You can prepare a separate gift for each family member or person in the company. To somehow distinguish the pieces, you need to select different colors and designs for each of them.
You should not use too bright colors and patterns, as this will make the cake look ridiculous. It is better to opt for muted pastel colors and a retro pattern: polka dots, stripes or dots. This packaging can be decorated with items that you associate with each family member or person in the company. Your work will definitely be appreciated.
Today I want to show you a cake with wishes made from paper as a gift to my dear godmother for her birthday. Surely your first thought will be: “Why does the birthday boy paper cake? Well, in fact, it is very nice to receive such a gift, it is original and will be remembered for a lifetime, and most importantly, inside each piece of cake there are hidden not only wishes for goodness and happiness, but also gifts, including money. So if you also like to surprise your loved ones, then I offer you a small master class in which you will learn how to make a cake with wishes from paper.
Materials:
- Paper or cardboard – 15 sheets
- Scissors
- Colored paper, corrugated paper
- Satin ribbon
- Napkins
- Glue stick
- Stapler
- Markers, paints or pencils
- Presents (at your discretion)
Stages of making a cake with wishes.
First you need to print this template on 12 sheets of paper:
Next stage: decor. I decided to decorate the cake with roses from napkins, but you can also use corrugated paper. The manufacturing process is described in detail. You can decorate each piece of the cake with roses, and another rose (larger in size) will be in the middle. I also cut out curls from brown colored paper that resembled a chocolate cake decoration.
The sides of the cake can be decorated with strips of colored paper, creating an imitation of cream.
When all the decorative elements are ready, you can proceed to the most interesting part - wishes and gifts. This is where you need to use your imagination! Since such a cake is suitable not only for a birthday gift for a friend, but also for a husband, children, grandparents, mothers, and even for a wedding, it is worth taking this factor into account.
I will present you with my example of wishes and gifts, but you can replace them with your own options if you wish.
- Cheerfulness – coffee (beans or stick)
- Interesting travels - shells
- Cool car - toy car
- Good health - vitamins, ascorbic acid or hecatogen
- Sweet life - lollipop, candy
- Big and pure love – heart or chewing gum “love is..”
- Incredible luck - a poker chip, can be replaced with a lottery ticket
- Making important discoveries is the key
- A lot of money - a bill
- Warmth and comfort in the home - knitting, can be replaced with a candle
- Have a good mood - smiley
- Women's joys - a bouquet of flowers, can be replaced with a pendant, ring, hairpin or something similar.
Also, in addition to the options that I used, I offer you a few more ideas for wishes:
- Inexhaustible energy - battery
- Find your path in life - compass
- Joyful changes, a sweet daughter or the happiness of motherhood, cute babies (or grandchildren) - a dummy
- Interesting ideas - light bulb
- Pleasant surprises - kinder
- New housing - key, small figurine in the form of a house
- Irresistibility, youth, beauty - mirror, lipstick
- Vivid impressions - pencils
- Visit anywhere in the world - globe-shaped keychain
- Energy for megabrains - nuts
- Romance in relationships - a candle
- Solving complex problems - formula
- True friends – dog figurine
- I wish you new things - button
- Sweet kisses – hygienic lipstick
Well, when all the wishes are ready, we put them inside each piece of the cake, place the pieces so that the cake comes out, circle the cake with a satin ribbon and tie a bow. We decorate the middle with a rose (it’s better not to glue it, but to insert it; for this you need to make a leg for the rose from wire or paper).
The paper cake is ready, although if you wish, you can make a tray out of paper, or packaging out of cardboard or cellophane, to make it more convenient to give. That's all, please your loved ones and be happy!