Flower from cucumber slices
Cut off a 5 cm long piece from the cucumber. Cut in half lengthwise.
Make longitudinal cuts on the peel with a knife (this is called “carbing”). Cut strips to use for the stem of a decorative flower.
Cut the processed cucumber slice into thin slices. Divide them in half and use as petals for "chamomile".
Supplement the “flower” with cherry tomato halves.
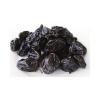
On the largest photo - a design option with "roses" of salted fish.
Chrysanthemum from boiled sausage
1) Lay out in the form of a track 18 slices of boiled sausage folded in half.
2) Roll these slices into a roll, starting from the fold of the first slice.
3) Tie the twisted roller in the lower quarter with a green onion feather.
4) Arrange 12 sausage slices in quarters around the core. These will be the bottom petals of the “flower”.
5) Open the petals of the core, decorate the “chrysanthemum” with greenery.
"Bouquet" of Chinese cabbage

1. Take an average head of Chinese (Beijing) cabbage.
2. Cut off the top loose part.
3. You can adapt a simple tool at hand - an olive can lid, which must be bent in half to make an oval groove. The edges of the resulting groove are not too sharp, but you still need to be careful. We must adapt to hold it as comfortably as possible, without touching the edges.
4. Take the groove as indicated and cut long grooves along the hard part of the head. At first, the groove should not go very deep. Closer to the base, you need to direct it deeper inward.

5. Before reaching about 2 cm to the end of the sheet, you must stop. Remove the groove and cut out the petal next to it. First, 3-5 petals are placed on one sheet.
6. Raise the finished petals and carefully cut off the remaining parts of the leaf with small scissors, if they did not separate themselves during the process of cutting the petals.
7. Remove the rest of the sheet.
8. Continue to perform the same operations. Holding the finished petals and choosing the outermost (of the remaining) sheet, cut the petals with a groove. The petals will get shorter and shorter.
9. Cut out the petals as much as possible. The very center can be cut and straightened.
Here is a flower obtained after 15-20 minutes of work (each next one is faster and easier). Now the flower must be put for half an hour in very cold water, or better, in water with ice. The flower will open more and the petals will bend more.
Such chrysanthemums can be made in advance, they are perfectly stored in a container with water for more than two days.

Roses can be made from red cabbage. We need the top largest sheets and the topmost, thinner, slightly wilted edge. Cut and carefully remove the whole sheet.
1. Cut off the edge of the sheet.
2. Cut out the petals with scissors. On a large sheet, they will turn out more. If the leaves are small, you can take two sheets.
3. Cut off the tip of a thick cucumber and remove all the pulp.
4. Cut the cloves along the edges with scissors.
5. Roll the cabbage petals into a tube, insert into a cucumber cup and straighten the petals
Roses do not need to be placed in water. cabbage leaf swells and unrolls. You can try twisting roses from a strip of green part of a cabbage, from a rolled ribbon thinly cut from a carrot or from a tomato. To put roses on a stem, take a part of a strong vegetable as a base (radish, cabbage). Stick a wooden stick (skewer) of the desired length into it, put an onion feather on it, and then the rose itself.
Leaves are very easy to cut from leeks and apple skins with small scissors. The cutting technique is the same as with paper. Children enjoy doing it!
Flower from thin long slices of cucumber

Hot pepper callas

1. We take hot peppers chili red or green.
2. Cut along the length from the stem to the tip.
3. Carefully cut the pulp around the stalk. Seeds should remain on the stem.
4. Expand the pepper, rinse in cold water and give the workpiece the shape of a calla flower.
5. We make a hole on the spread of the future flower and carefully insert the stalk with seeds into it.
6. Cut out the leaves from any green product (cucumber or others) and create a curly composition.
ADVICE. If the pepper burns your hands after work, wash them thoroughly and wipe them with vegetable oil.
Carrot lily

1. We give the vegetable the shape of a cone and a pentagon, cutting with a long knife in a circle from five sides.
2. On each of the 5 cut sides, cut through the petal.
3. Shape the petal with scissors.
4. Remove part of the pulp from under the petals of the first row (make the cone thinner). We cut out five more petals, placing them in a checkerboard pattern relative to the petals of the first row. Do the same for the third row.
5. With a knife, shorten the remaining core and cut it into a cone.
onion chrysanthemum

1. To prepare chrysanthemum, take a small round onion.
You can take both white and red onions.
The smaller the bulb, the more beautiful the flower turns out.
Try to choose a thin-walled bulb, then the petals turn out to be thinner and open more beautifully.
2. Peel the bulb and cut off the top and bottom by about 0.5 cm.
3. With a thin sharp knife, carefully cut almost in half, without cutting to the end about 0.5 cm.
The incision is made from the upper side - where the feather grows.
4. Then cut in half again in the same way.
5. Next, cut into as many pieces as you can. It is desirable to make as many incisions as possible.
If the cuts are not deep enough, the flower will not bloom well, and if it is too deep, the flower will fall apart.
6. Place the bulb in water at room temperature - the water should completely cover the bulb.
After an hour and a half, the chrysanthemum should “bloom”.
The time of “blooming” of chrysanthemum depends on the variety of onion. Some varieties are enough and 40 minutes, and some need a couple of hours.
7. To give the flower brightness, dip the tips of the blossoming chrysanthemum into beetroot juice (rub raw beets and squeeze through a cloth).
Coloring time - until the desired color is obtained.
You can use any other food coloring - brightly colored juice (for example, cherry, blackcurrant), yellow saffron solution, Cahors or other red wine, pickled beetroot brine, etc.
You can paint the whole flower.
onion flower

1. We clean the bulb without cutting off the root seal, but only after cleaning it well from the roots.
2. We make 4-5 cuts (in this example we make 4 cuts) to a depth of 2-3 layers (in this example, 2 layers).
3. We bend the extreme layers (petals), and remove the inner incised layers with a knife. We do all this with caution, because. petals are very brittle.
4. Again we cut the layers of the bulb, shifting the cuts in a checkerboard pattern relative to the first petals. The first incised layer is left, and the inner layers are removed again.
5. Repeat these steps until we reach the middle of the bulb.
7. Then put in a vinegar marinade of water, vinegar and sugar (vinegar and sugar to taste) for 10 minutes or more to obtain the desired taste.
If you want to get a colored flower, you need to add food coloring to the marinade (brightly colored juice (for example, cherry, blackcurrant), yellow saffron solution, Cahors or other red wine, pickled beetroot brine, etc.).
We take out the "flower" from the marinade, slightly shake off the liquid, beautifully straighten the petals and place on a dish.
Lotus (water lily) from the bow

Peel the onion, wash thoroughly. We apply the pattern with a knife, while trying not to cut through the next layer. Carefully cut out and move the petals of the first row.
Next, we make the second row. The petals of the second row should be placed between the petals of the first row. Then we make the third and fourth rows.
Cut off the top of the remaining middle. We make small indentations in the middle, you can fill them with pieces of carrots or egg yolk.

1. We take the onion, carefully, so as not to damage it, peel it. Wash and dry.
2. Cut the onion across. With a sharp knife, cut triangles out of the onion in a circle.
3. Cut out a circle from a carrot, and make a grid on top with a knife.
4. We take out the core from the almost finished flower and scroll the remaining layers in a circle.
5. We put a carrot core in the center of the lotus and the lotus is ready!
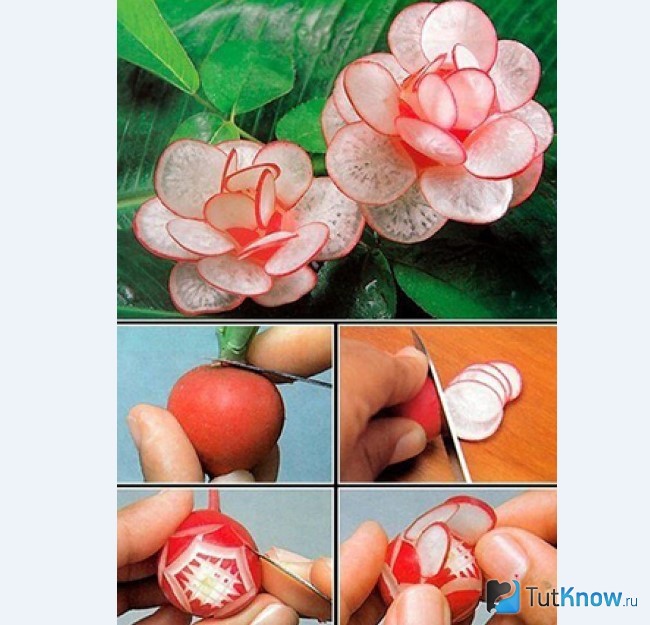
radish flower

To make this flower, you will need two red radishes.
1. We clean the radishes, wash and dry.
2. Cut one radish into thin circles (almost transparent)
3. At the second radish, we make a grid on top. And around the entire circumference of the incisions, as shown in the photo.
4. We insert thin circles cut from the first radish into the cuts. The flower is ready.
Radish water lily

My radish, cut off the top and bottom.
We cut through the “petals” with a knife, and then cut and remove the pulp from under the “petals”.
We also cut through the next row of “petals” in a checkerboard pattern.
With a spoon-noisette (or you can use a tea or coffee spoon) we remove the middle of the future flower, and we get a “water lily” from a radish.
radish roses

Cut off the skin in a thin layer in the form of a petal. You need to make 5 such cuts.
Cut 5 petals. The petals should be evenly spaced around the circumference of the radish.
2 row of petals: cut off the skin between the petals, then cut 5 petals. So we perform each row, as many of them can happen.
When the flower is ready, it must be put in cold water with ice. After 20-30 minutes, the flower will open, you can take it out of the water and decorate the dish.
As rose stems, you can use wooden skewers wrapped in green paper.
Garnish with lemon

The easiest way to give lemon slices an unusual look is to flute. On the peel of a carefully washed lemon, longitudinal grooves are made using a special tool or groove-like cuts are made using a knife with a sharp tip. After that, you can cut the lemon into thin rings with an ordinary well-sharpened knife. Thicker slices are designed to decorate the edge of a glass with a soft drink.
If you do not have a special knife, then you can use a regular canned food lid (with a ring) to cut the grooves by bending it in half.

If you find an error, please highlight a piece of text and click Ctrl+Enter.
Coming soon delicious holidays. It's time to prepare for them, hone your skills in decorating dishes. I make such flowers delicious: in addition to sugar and vinegar, I pour salt into the water so that the solution is pleasant. Then the onion becomes crisp and very delicate taste. There is an eternal battle for this chrysanthemum: everyone wants to eat it at once))))
Compound:
- red onion ~ 1 pc.
- vinegar and sugar optional
Cooking:
Take a peeled onion, cut off the top and bottom (approximately 0.5 cm).

Cut the onion into 16 parts, without cutting about 0.5 cm to the base.

Put the onion in any deep container, pour room water into it
temperature. The bulb must be completely covered with water. Add vinegar
and sugar to taste. After an hour or two, depending on the variety of onions, chrysanthemum
should "open up".


Onion chrysanthemum can be used to decorate salads,
and as an independent snack.
Decorate and even the simplest dishes in preparation will definitely not be left without attention!
 Onion chrysanthemum is made from a small round onion. Both white and red onions are suitable. From a small bulb, the flower turns out more beautiful.
It is better to choose a thin-walled bulb, in this case the petals are thinner and more beautifully revealed. We clean the onion and cut off its top and bottom by about 0.5 cm.
 Carefully cut the onion from the upper side with a sharp thin knife almost in half, without cutting to the end about 0.5 cm.
Then again in the same way - in half.
Continue cutting the onion into as many pieces as you can. Of course, it is better to make as many cuts as possible. It must be borne in mind that the quality of our flower depends on the depth of the cuts: if the cuts are not deep enough, the chrysanthemum will not bloom well, and if it is too deep, it will fall apart.
 We put the onion in water at room temperature so that the water completely covers the onion. On average, after about 1-1.5 hours our should "spread out". Depending on the onion variety, this time can vary from 40 minutes to a couple of hours.
To add brightness to the chrysanthemum, you can dip its tips in beetroot juice squeezed from raw mashed beets. Depending on the desire and purpose, the flower can be painted with any other food coloring- brightly colored juice, say, blackcurrant or cherry, yellow saffron solution, red wine, etc.
Here she is, our beauty - 
Which festive table does without a herring under a fur coat or Olivier? Do you know how easy it is to decorate these and other salads? You need to buy a few small bulbs and cut flowers out of them. Simply and easily!
How to make onion flowers
To cut the flower, take a small elongated onion head.

On both sides, cut the onion about 5 mm. Peel off the husk.

Without cutting all the way through, cut the onion in half, starting from where the feather grows to the bottom.

Then, without cutting to the end, make a perpendicular cut - you get 4 sectors.

Cut each quarter into several pieces, forming petals.

Put the bulb in cold water with ice - the chrysanthemum should open.

For a flower, you can take both white and red onions. The smaller the head, the more spectacular the flower comes out of the onion. Try to choose thin-walled bulbs, then the petals will turn out thin and open more beautifully.
If the cuts are not deep enough, the onion flower will not bloom well, and if it is too deep, the chrysanthemum will fall apart. Put the onion flower into the water so that the liquid completely covers it. The time of "blooming" of chrysanthemum depends on the variety of onions. This can take 40 minutes or 8 hours.
To give a flower from an onion brightness, you can dip the tips of a blossoming chrysanthemum into beetroot juice, yellow saffron infusion, red wine.
Charming onion chrysanthemum will undoubtedly be the best decoration for many dishes! It looks especially good on salads, such as a fur coat and Russian salad, and also perfectly decorates meat and fish dishes, meat pies, snacks and many other dishes. The most curious thing is that it will not be difficult to make such a chrysanthemum, as well as paint it in the future so that it accurately imitates a flower. Look at the two onion chrysanthemums below, yellow and pink, both dyed with natural ingredients. And how they look like a real flower!
And even a simple white onion chrysanthemum also looks very, very festive, wonderfully decorating a salad with itself:

The work is quite simple, you can do it in a matter of minutes:
1. First, cook large onions.

2. Peel it, cut off both the bottom and the top about half a centimeter (even a little less). Then start cutting the onion in half, but not all the way through. If you cut it incompletely, the bow will not open, and if it is cut to the very end, it will fall apart. Cut with a sharp knife into as many divisions as possible - then the flower will be fluffy and very beautiful.

Ideally, you should get such a blank as in the photo below. Put the cut onion in warm water for an hour - it, like a flower, will gradually open. The opening time depends on the type of onion. It may take 30 minutes to 2 hours.

3. At the end, the still white chrysanthemum can be painted. For red or pink chrysanthemums, use fresh beetroot juice and dip the onion chrysanthemum tips down (or whole, if desired). The intensity of staining depends on the duration of exposure in the juice - check every 10 minutes to get the desired color.


Learn how to make a cone from carrots, chrysanthemum from onions, flowers from radishes and apples. And carving for beginners will help this, which everyone can master.
The content of the article:
Carving in translation from English means "cutting". In cooking, it is the art of artistic cutting of fruits and vegetables. This interesting type of creativity originated in Southeast Asia. Japanese cooks lined pottery in which food was served with leaves. They understood that the beautiful arrangement of the leaves gives the dish an additional appeal and began to artistically cut fruits and vegetables.
Later, carving penetrated Europe, but at first it did not have much popularity here. However, with the advent of restaurants, this art has become in high demand.

There are kits for artistic cutting for every budget and taste. But carving for beginners can be carried out without the use of special equipment for this type of creativity.
If desired, you can turn sets for wood cutting, for linocut into tools for carving.
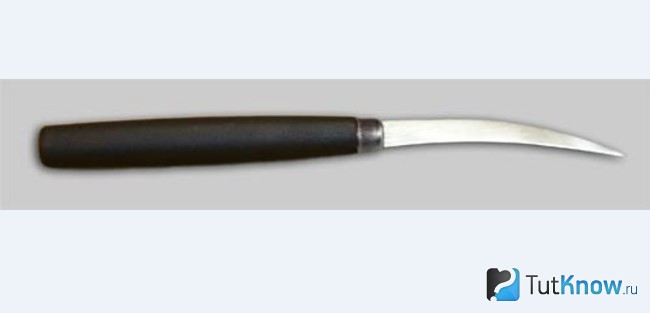
The most important knife used in this type of creativity is Thai. That's what he is.

With the help of such a tool, you can perform various carving elements from vegetables and fruits. Therefore, if you have a similar narrow knife with a thin blade, you can use only one at the initial stage. As you master this technique, you can purchase additional equipment to create more and more complex and interesting compositions. For these use the following types knives:
- Thai - sickle-shaped curved and wedge-shaped knives also belong to the group of these tools.
- Karbovochnye are V-shaped tools, as well as oval and round.
- Flute. Used to remove thin strips from fruits and vegetables. Flutes are the decorative grooves on such instruments.
- Noisettes are notch knives that are used to cut shapes out of fruit. They have a different shape (rhombus, round, clouds, etc.).
- Engraving and other carving knives with replaceable blades are used if you need to peel, remove the core; clean vegetables, etc.
- Culinary tools such as our domestic cookie molds.

Here is a sickle-shaped knife, which is used, like the Thai one, but they cut larger parts with it.
The fluting knife makes it easy to groove fruits and vegetables. First, longitudinal strips are made with this tool, and then, for example, a lemon is cut across in circles and flower-shaped figures are obtained.

Carving knives for carving come in various diameters. They can be V-shaped and U-shaped. The first is easy to cut out the leaves, to carry out engraving images on the fruit bark.

With the help of U-shaped knives, ornaments with rounded cuts are created.

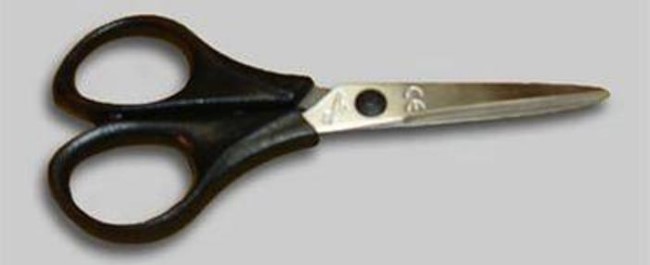
Also included in the carving tools are small scissors. With the help of them, flat straight, oblique or other cuts are made along the edge of the fruit.
Another interesting tool for carving is a double-sided noisette spoon. It is used for extracting pulp from large fruits, cutting balls, hemispheres.
The noisette spoon is often used in French cuisine. Cooks use this tool to cut balls out of raw potatoes and then deep fry them.

If you have not acquired such tools yet, you can replace them by carving vegetables and fruits with a scalpel, a fruit peeler.

Decoration from vegetables - a flower from a radish
The dish looks much more attractive if such an edible flower flaunts in its center or side. Even those who have never done this before will be able to cut it out of a radish. For this decoration, you can use ordinary small scissors and a sharp knife. In addition to them, you will need radishes. The root crop should be even, rounded. In the photo it is red, but now those who grow this vegetable in their backyards know that radish varieties of various colors have been bred. Therefore, a lily from this vegetable can be red, pink, yellow and even purple.

Cut off the top of the radish and mentally draw a 5-gon here. Now lead from this place down with a knife (but not all the way) so that the first petal is indicated. So complete all five.
To make the next, inner row of petals clearly visible, cut around the layer of pulp that is located between the first and second row of petals.
Now take the scissors and process all 5 petals of the outer row with them, sharpening the top of each, as shown in the photo.

Next, complete the second row of petals, which is staggered relative to the first. Then - the third and subsequent inner rows.
This is how you can make salad dressings from vegetables. Try to cut not only a lily, but also a rose from a radish.
To make it so multi-petalled, wash the root crop, cut off the green part from it. On the opposite side, make several parallel cuts in the center and then on the side of the root. Take another radish, chop it into thin circles. Insert them into the slots of the first root crop. Here is such an elegant flower you got. Find out what other salad dressings you can cut out quickly.
How to make a lily from an onion?

Here is such a wonderful chrysanthemum you will get in just 5 minutes of work.
For this carving you will need:
- large onion;
- sharp knife;
- a bowl of water;
- beetroot juice.

Now make a cut perpendicular to this, and then a few more. The more of them, the more fluffy the flower will turn out.

Pour water at room temperature into a bowl, lower the workpiece into it, let the onion soak in the liquid for 40-120 minutes. During this time, the petals will "bloom", and you will get a beautiful carving flower.
The time for soaking onions in water depends on the variety. Some will begin to “bloom” in as little as 40 minutes, while for others, the waiting time for this process will be longer.
Now moisten the workpiece in beetroot juice, and you will get such a wonderful flower.

You can, by turning the chrysanthemum over, moisten only the tips of its petals in the juice, or place the entire flower in the food coloring liquid.
How to cut a delicious carrot decoration?

Don't these bumps look bright, realistic and festive? You can make them using carving knives, or by taking a regular kitchen knife with a narrow blade.
Take a root crop with a diameter of at least 3 centimeters. Cut upwards so that the length of the carrot is 8–12 cm. Remove the extreme pulp at the wide end of the root crop so that a square “tail” remains.

Now process the workpiece from the same side along the turn, rounding its hangers from all sides. Then visually divide this top of the carrot into 6 parts, which will turn into scales of a do-it-yourself cone.

Deepening the tip of the knife by 2–3 mm, mark these scales. To prepare the area for the second row of scales, cut the carrot pulp in a circle just below the first. In the same way, but in a checkerboard pattern, complete the second row of scales. Beneath it again remove some carrot pulp in a cone to make the third row of scales, which will be staggered in relation to the second.

In the same technique, you can make a few more cones to create a beautiful vegetable bouquet.
To harden the carrots and open the scales, place them in ice water for 15 minutes.

If you were making this salad dressing, then put the cones in the center of the dish or place them around the edge of it. If you want to create such an amazing bouquet, as in the photo, then string the processed carrots on a wire wrapped in green floral tape. You will stick the second end of the wire into a pumpkin, the flesh of which is also carved using the carving technique. It remains to cut the petals from the cucumber, decorate the composition with dill, after which you can put it in the most prominent place in the house or in the center of the festive table.

If you have carving knives, then use a V-shaped knife to make pointed scales. A U-shape will help create rounded ones.
Today you learned how carving is made from vegetables. Follow the publications and soon you will learn how to artistically cut fruits that will turn into a firebird, a basket, and become colorful flowers.
In the meantime, check out the videos from which you will learn how to cut a rose from carrots, see what ordinary vegetables can be turned into with carving: